NexHealth Synchronizer™ Installation Guide
Learn how to install the NexHealth Synchronizer at each practice that uses your software
Introduction
The NexHealth Synchronizer™ is our in-house technology that lets healthcare practices sync their data with developers' apps.
After creating an Institution in the NexHealth Developer Portal, follow the instructions below to install the Synchronizer at the practice.
Compatible systems
| System | Versions |
|---|---|
| athenahealth | All (cloud) |
| Curve Hero | All (cloud) |
| Cloud9 | All (cloud) |
| Denticon | All (cloud) |
| Dentrix Ascend | All (cloud) |
| Dentrix | G6.2+ |
| Dentrix Enterprise | All (server) |
| Dolphin | All local (server only) *includes multi-clinic |
| PracticeWorks | All local (server only) |
| Eaglesoft | 18+ (server) *includes n-site |
| eClinicalWorks | v11.53+ (cloud) *onprem not supported at this time |
| Modernizing Medicine (ModMed) | All (cloud) |
| Open Dental | V17+ (server) *includes multi-clinic |
| OrthoTrac | All local (server only) *includes multi-clinic |
Performing your first installation?
Check out our Approaching your first installation guide to learn how to talk with practices and what discovery questions to ask.
On-prem systems installation (Self-Installer): Dentrix, Eaglesoft, Open Dental
This process applies for the following systems:
- Dentrix
- Eaglesoft (both single and multi-location called “n-site”)
- OpenDental (both single and multi-clinic) *please note that middle-tier setups require scheduled time with a NexHealth engineer
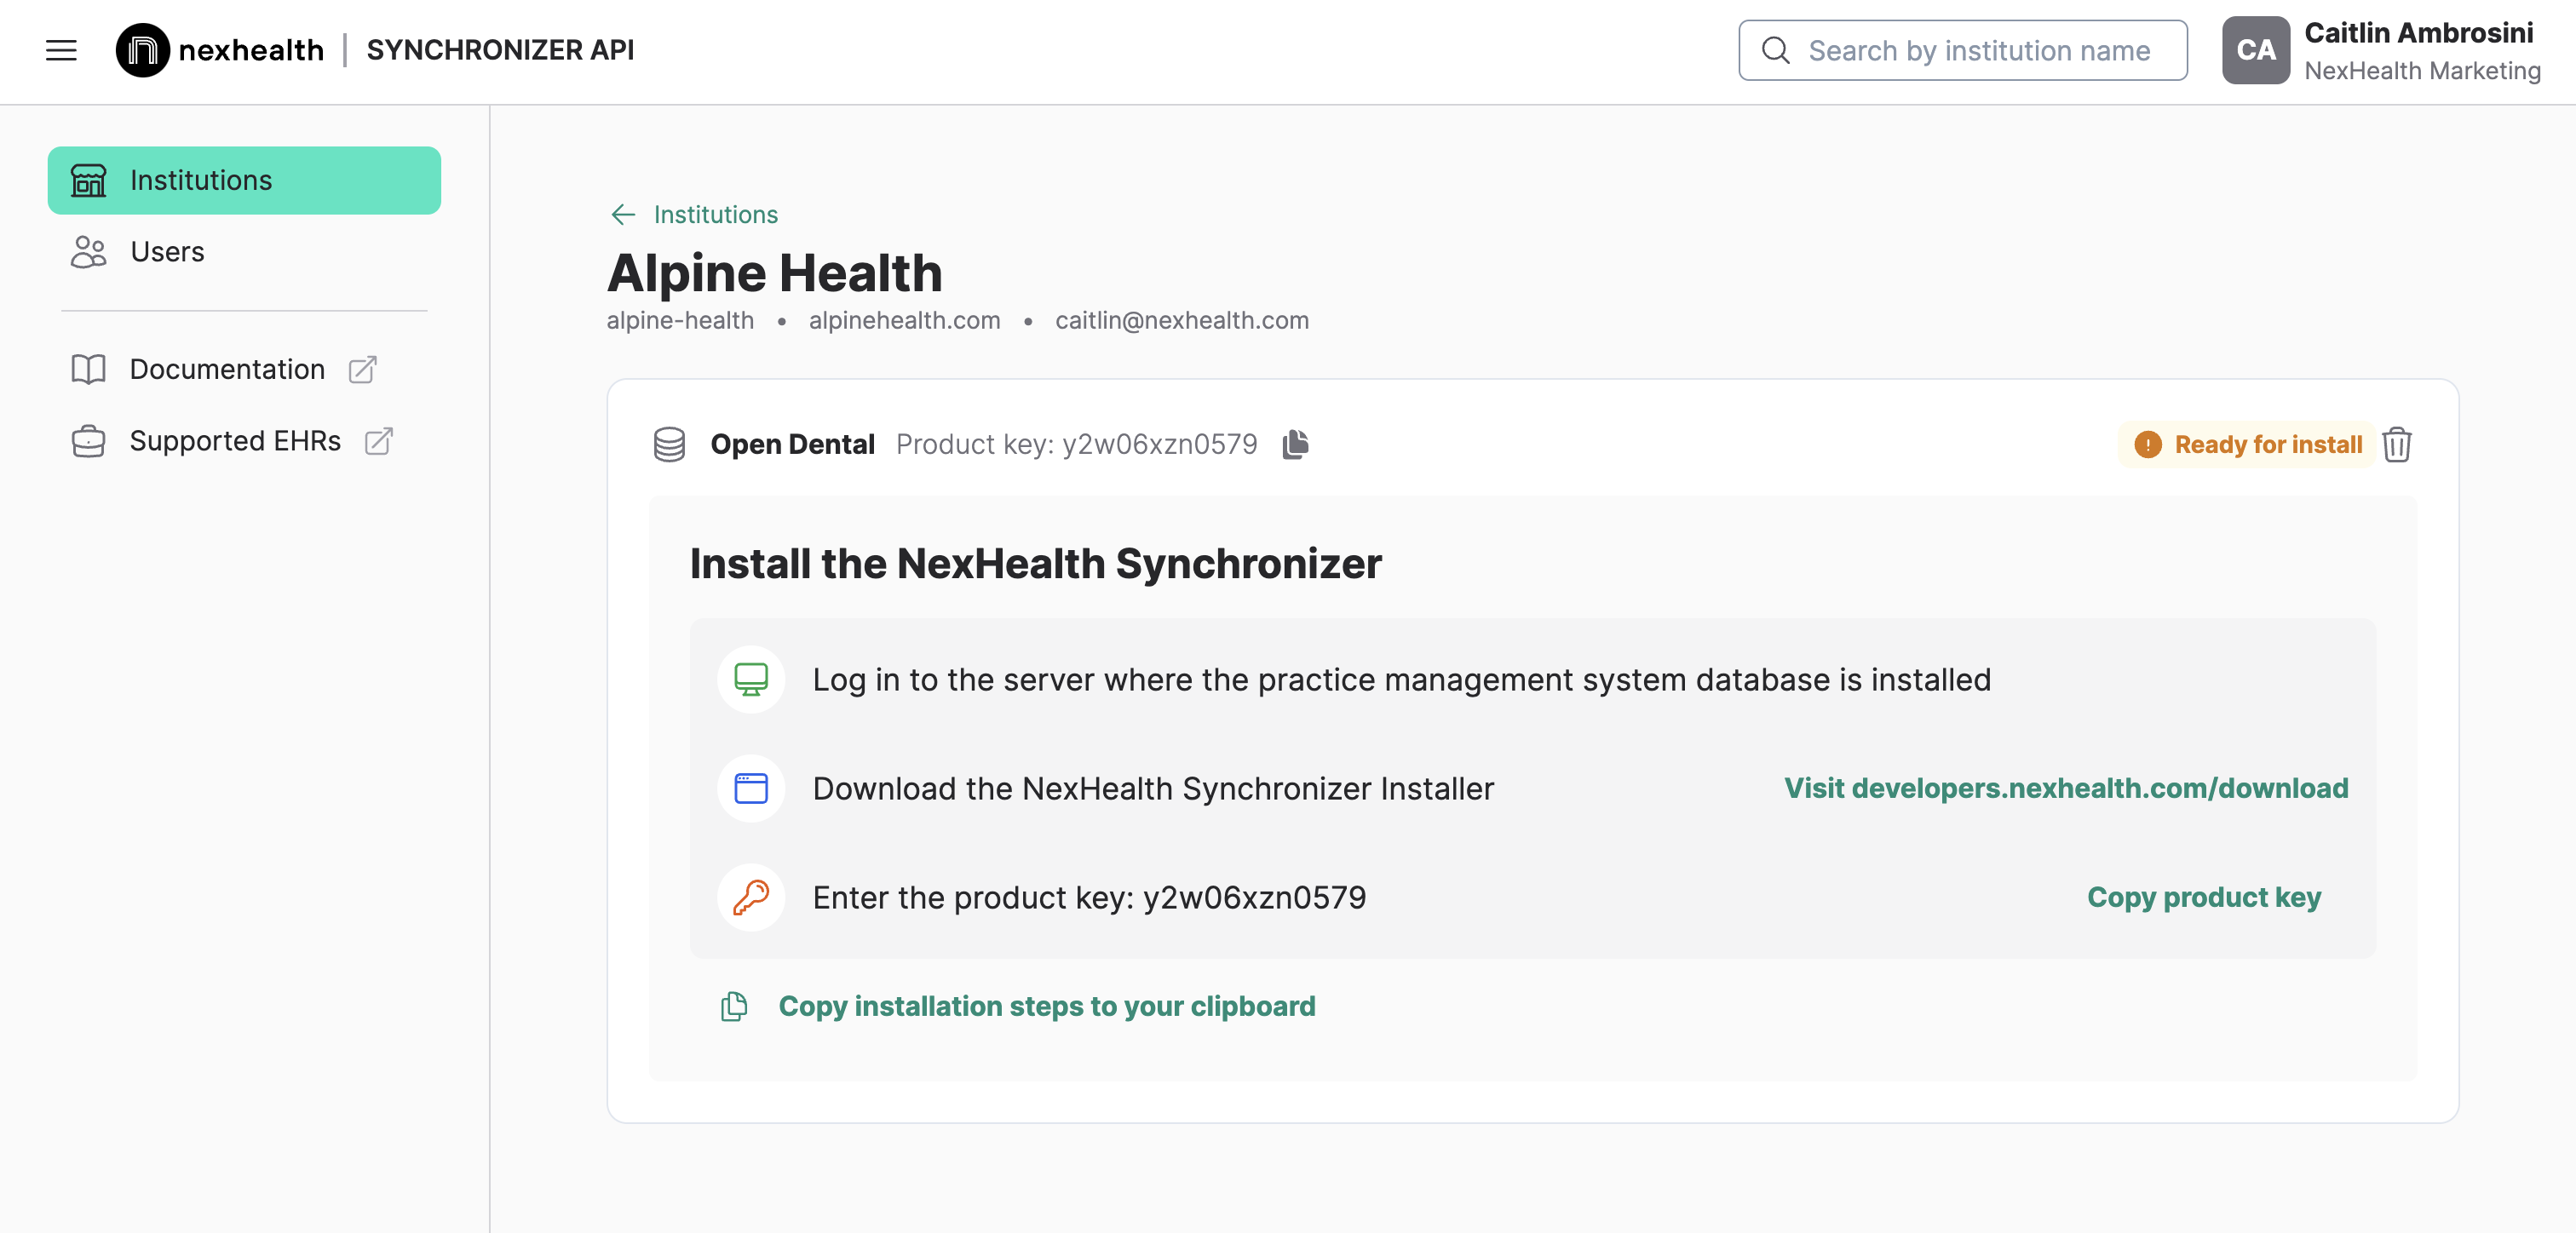
For each practice with one of these on-prem or server-based practice management systems, the Developer Portal will provide you with a unique product key for installing the Synchronizer. If you need help using the Developer Portal to obtain a product key, please contact [email protected].
To sync with one of these on-prem practice management systems, you will install the Synchronizer on the practice’s server. Follow these steps:
-
Create the Institution and sync in theDeveloper Portal: Create your Institution and sync by clicking "Create Institution" and then selecting the practice management system from the sync dropdown. See further instructions on Institution and sync creation. This will create the product key, which you will use for step 2 through installation.
-
Retrieve the unique product key: After creating the Institution and product key in the Developer Portal, log on to the server computer where the health record system database is installed.
-
You can also copy instructions from the product key page in the Portal to send to an IT contact if you don’t have access to the practice’s server.
-
-
Open theNexHealth installer link in a browser to download and run the installer: On the server where the practice management system database is installed, ensure you are logged into Windows with an account that has “Administrator” privileges to install background services. The installer will look like this:
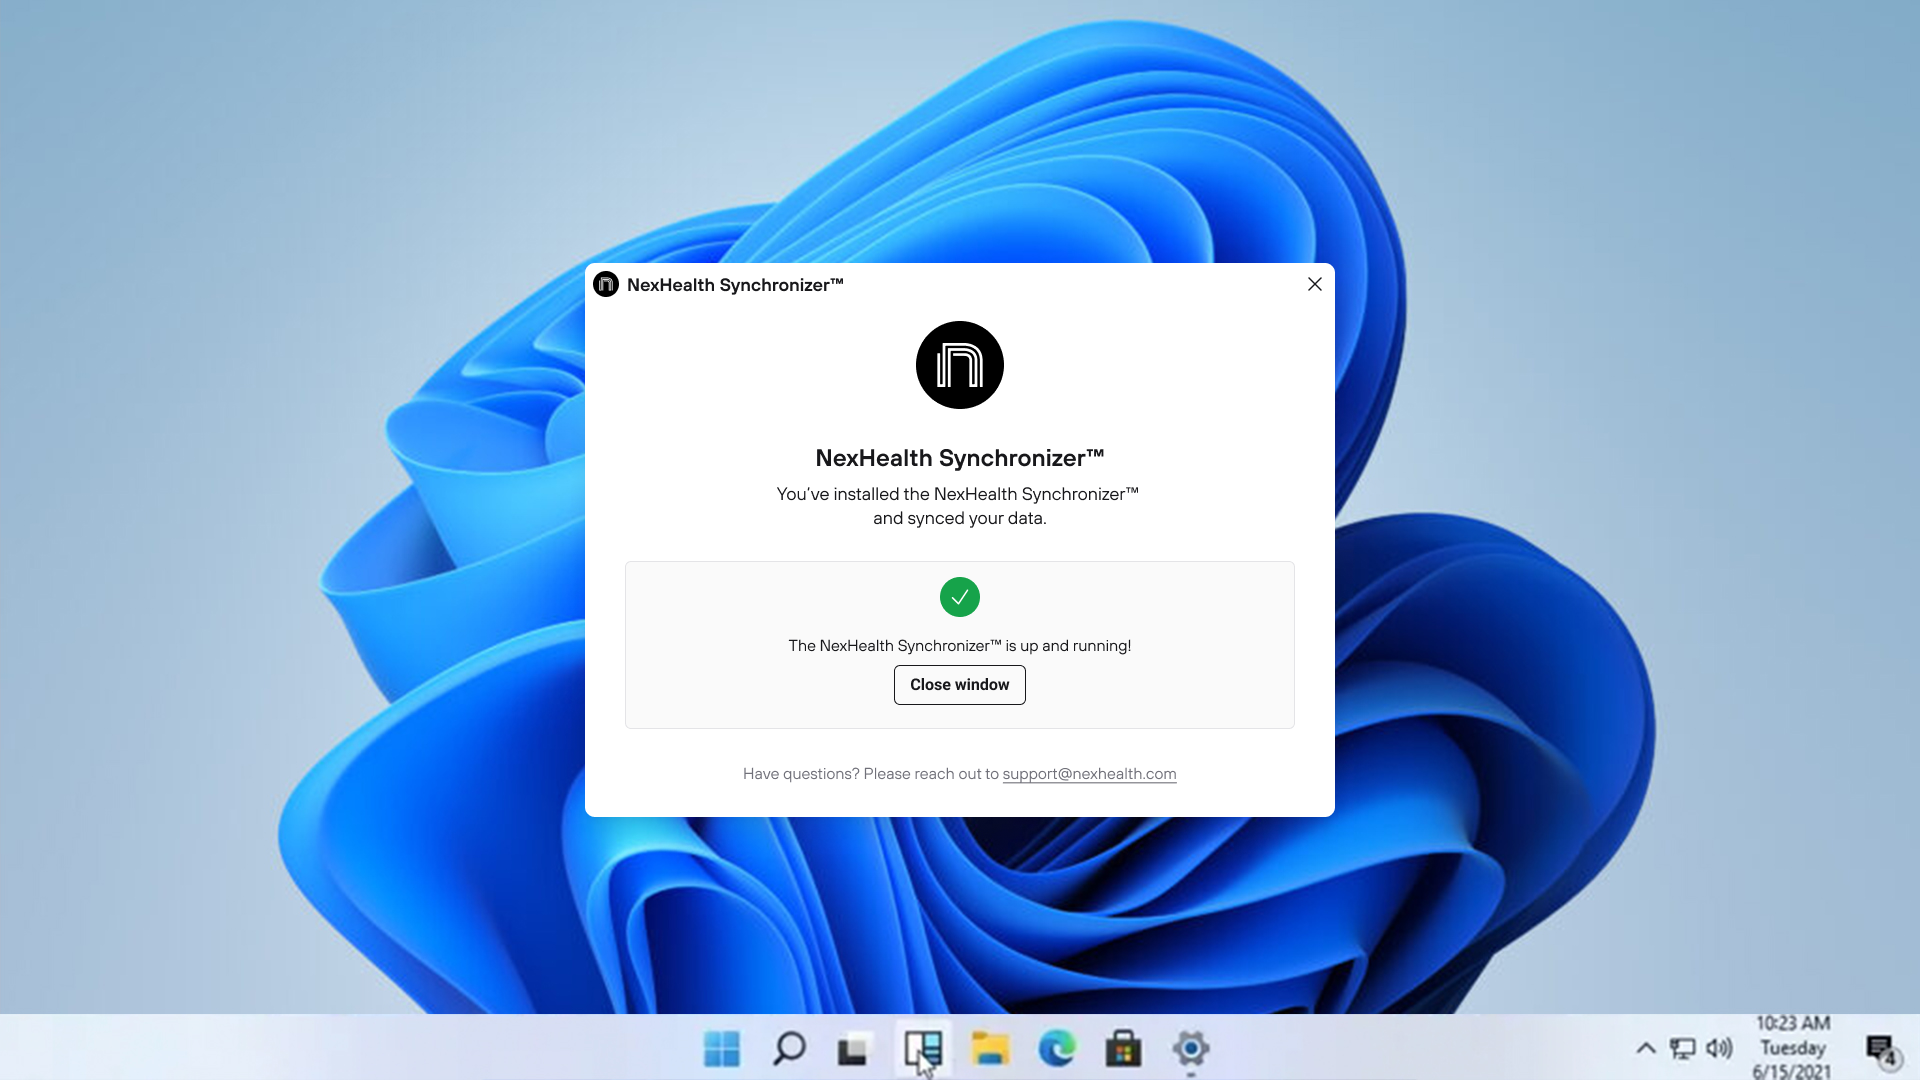
- Follow the steps in the installer to completion: Enter the product key you copied from the Developer Portal. This key should be specific to that sync. Each sync has its own product key. Once the installation is complete, the Institution status will update to "Select Locations" in the TO DO section of the Portal.
- Selecting locations: After creating the Institution, installing the Synchronizer, and running the historical read, you will be prompted to select locations from which the Synchronizer will read data.
- If you are working with a subset of locations within an organization, you can multi-select locations by checking the box next to the location name. You can select all or just some of the available locations supported by that server computer.
On-prem systems installation: All others
For on-prem or server-based practice management systems that are not Dentrix, Eaglesoft, or Open Dental, you will create the sync in the Developer Portal before scheduling the Synchronizer installation with NexHealth.
To sync with these on-prem practice management systems, follow these steps:
-
Create the Institution in the Developer Portal: Create your Institution and sync by clicking "Create Institution" in the Portal. See further instructions on Institution and sync creation.
-
Create the sync : After creating the Institution, create the sync by selecting the on-prem practice management system from the drop down list.
-
Schedule the installation: After selecting the practice management system, you will be prompted to schedule an installation with a NexHealth engineer. Click the link provided to select an installation time.
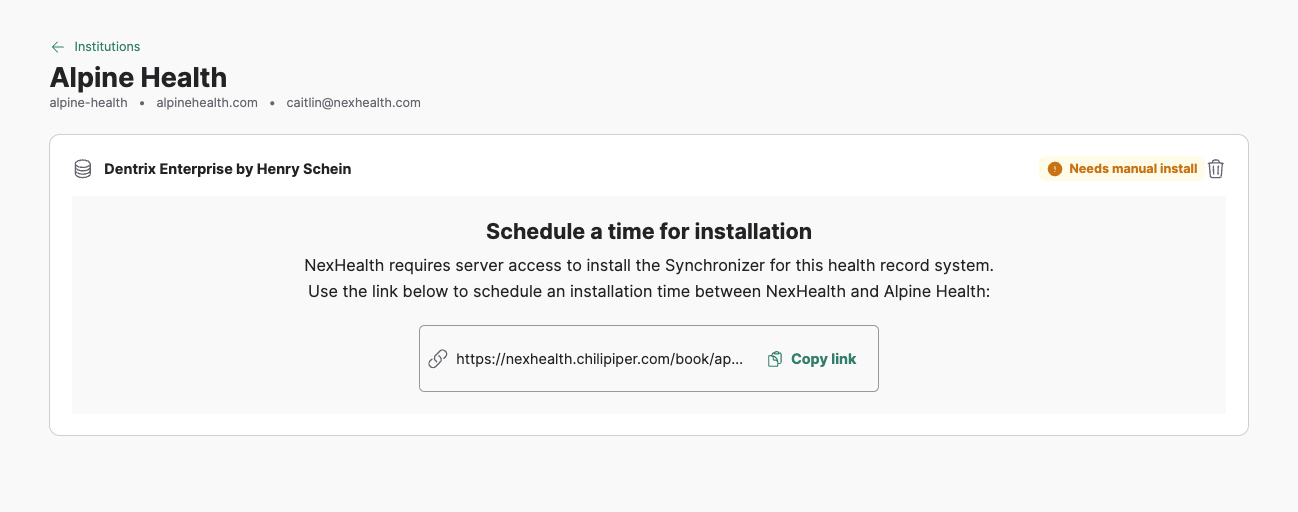
- Before the time and date of the scheduled call, please prepare the practice (and their IT if applicable) using the guide provided here.
- If a manual install is needed but not scheduled, you will see your Institution in the TO DO section of the Developer Portal.
- Once the installation is scheduled, the Institution will move to the IN PROGRESS section. You will also see the sync screen update to reflect that the installation is scheduled. No further action is needed until NexHealth completes the installation.
-
Install complete: Once NexHealth has completed the installation, the Institution will move to the ALL section of the Developer Portal, the sync will move to the "Active" status, and the sync is ready to use.
Cloud systems installation
For each practice with a cloud-based practice management system, you’ll generally need to provision a user account for the system and install a Chrome Extension on each practice workstation that accesses the system. Please note that you may need to reset the password for the new user you created for certain cloud-based systems.
The Developer Portal will provide you with a unique token that the practice should use to authenticate to the Chrome Extension. If you need help using the Developer Portal to obtain a token, please contact [email protected]. Note that you do not need a product key for cloud-based installations.
Here are the general steps for creating a cloud-based sync. See below for EHR-specific instructions.
- After creating the Institution in the Portal and creating the sync, submit the practice’s unique EHR URL with the admin credentials for the new user you created for the health record system.
- A NexHealth engineer will install the Synchronizer using the provided credentials. Please ensure that the credentials have been tested and validated for successful login before submission.
- If there is an error with the credentials, NexHealth will push a notification to the Developer Portal, which can be viewed in the TO DO section.
- Once the Synchronizer is up and running, the Institution and sync are moved to the "Active" state in the Portal.
- Communicate with the practice or their IT provider that the NexHealth Chrome Extension will need to be installed on every computer that accesses the health record system. The extension token for the sync is available directly in the Portal. This token should be specific to that sync. Each sync has its own token.
Athenahealth
- Create an Athenahealth username and password for a dedicated user account that will only be used by NexHealth
- Allow the user account access to all Roles (click on the "Roles" tab that appears on your new user > 'edit roles' and choose the 'Select All' button). As an alternative, the user needs all schedule admin, department, provider, and patient chart-related roles at a minimum.
- Install Chrome Extension v6 for Athenahealth on each practice workstation that accesses the practice management system. Detailed instructions below.
- Use the token you received from the NexHealth Developer Portal to authenticate the Chrome Extension on each workstation.
Cloud9
-
Create a Cloud9 username and password for a dedicated user account that will only be used by NexHealth
-
Allow the user account access to all Roles (click on the "Roles" tab that appears on your new user > 'edit roles' and choose the 'Select All' button). As an alternative, the user needs all schedule admin, department, provider, and patient chart-related roles at a minimum.
-
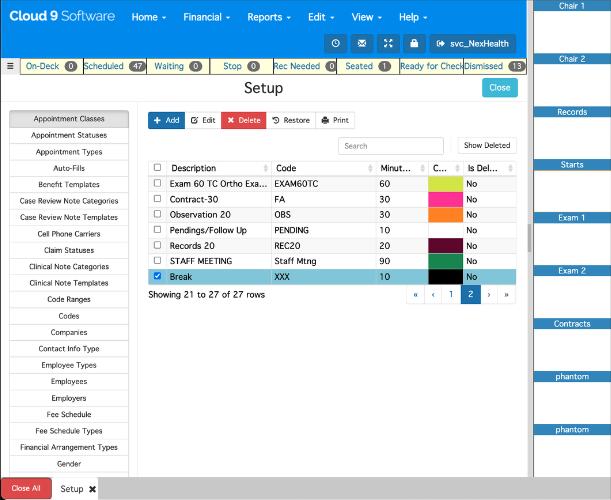
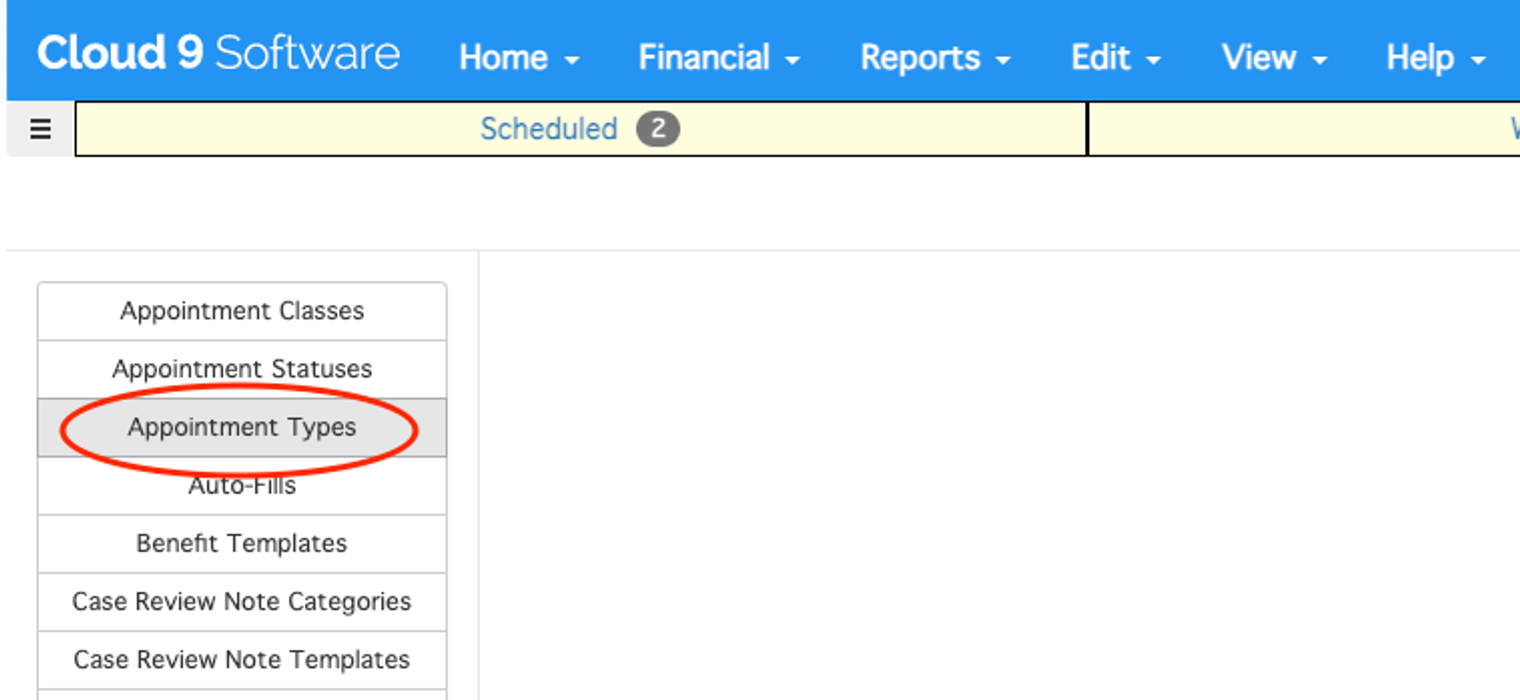
If using online booking, make note of all "Appointment classes" which should be considered as unavailable for scheduling. For example, in the screenshot below, the "break" appointment class should be considered as unavailable time. This will need to be communicated to NexHealth developer support when you submit your installation request.
-
Please note that if using online booking, all Cloud9 appointments must be assigned a Cloud9 appointment type. All appointment insertion attempts without a Cloud9 appointment type will fail. For this purpose, please make note of the default appointment type that the integration will use in the event that you do not specify the appt type via appointment descriptors.
-
Install Chrome Extension v7 for Cloud9 on each practice workstation that accesses the practice management system. Detailed instructions below.
-
Use the token you received from the NexHealth Developer Portal to authenticate the Chrome Extension on each workstation.
Curve Dental
- Retrieve the unique URL for the Curve Dental account, e.g: https://practicenamehere.curvehero.com
- Create a Curve Dental username and password for a dedicated user account that will only be used by NexHealth. Ensure MFA has been disabled for this user.
- Set the user account “Role” = “Office Manager”
- Install Chrome Extension v2 for Curve Dental on each practice workstation that accesses the practice management system. Detailed instructions below.
- Use the token you received from the NexHealth Developer Portal to authenticate the Chrome Extension on each workstation.
Dentrix Ascend
- Retrieve the unique URL for the Dentrix Ascend account, e.g: https://live.dentrixascend.com/login
- Retrieve the Dentrix Ascend organization alias (ORG ID)
- Create a Dentrix Ascend username and password for a dedicated user account that will only be used by NexHealth. Ensure MFA has been disabled for this user.
- Set the user account “Role” = “Receptionist”
- Install Chrome Extension v3 for Dentrix Ascend on each practice workstation that accesses the practice management system. Detailed instructions below.
- Use the token you received from the NexHealth Developer Portal to authenticate the Chrome Extension on each workstation.
.
Denticon
- Create a Denticon username and password for a dedicated user account that will only be used by NexHealth. When creating the username, use the format "NXHUSER****", where the asterisks represent a number that will provided in the developer portal (if the username shows as no longer available, try incrementing the number - you can increment it by a large number if needed)
- Set the user account “Group” = “Office Manager”
- InstallChrome Extension v1 for Denticon on each practice workstation that accesses the practice management system. Detailed instructions below.
- Use the token you received from the NexHealth Developer Portal to authenticate the Chrome Extension on each workstation.
eClinicalWorks
- Retrieve the unique URL for the eClinicalWorks account, e.g: https://yourpracticenamehere.eclinicalweb.com
- Note: If the eClinicalWorks web URL is not available or cannot be found, reach out to [email protected] for help troubleshooting.
- Create an eClinicalWorks username and password for a dedicated user account that will only be used by NexHealth
- Set the user account “User type” = “Staff”
- Provide the user account with access to the following areas:
- Menu ⇒ Patient ⇒ Lookup to search and select patients to view their details in Patient Hub
- These items can be found in Menu > Security Settings > By Security Attribute
- Create New Patient
- Delete Appointment
- Navigate to Menu > File > Authentication Settings and ensure “Enforce eCW URL Launcher for Login” = false
- InstallChrome Extension v4 for eClinicalWorks on each practice workstation that accesses the practice management system. Detailed instructions below.
- Use the token you received from the NexHealth Developer Portal to authenticate the Chrome Extension on each workstation.
Modernizing Medicine (ModMed)
We need 2 ModMed user accounts that we refer to as the Clinical user account and Management user account
- The Clinical user account needs access to the following headers:
- Schedule
- Appt Flow
- Patients
- Document Management
- The Management user account needs access to the following headers:
- Practice Settings
- Including the sub-section called Event Logs with access to Audit Event Logs
- Clipboard / Kiosk / Portal Settings
- Practice Management Settings
- Practice Settings
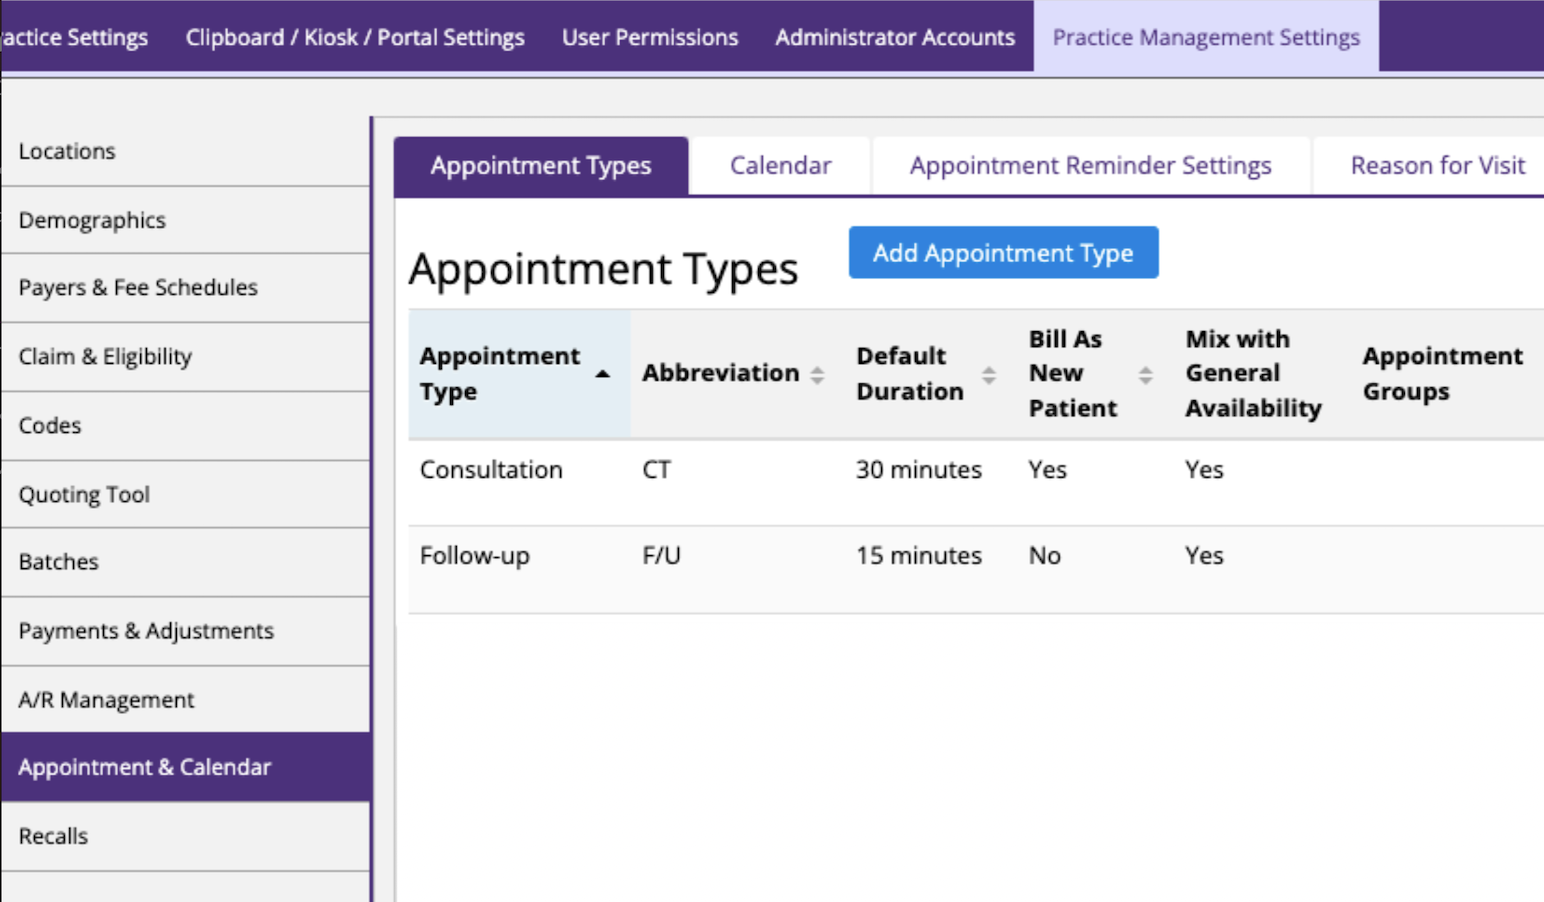
Please note that if using online booking, all ModMed appointments must be assigned a ModMed appointment type. All appointment insertion attempts without a ModMed appointment type will fail. For this purpose, please make note of the default appointment type that the integration will use in the event that you do not specify the appt type via appointment descriptors.
A list of available appointment types may be found in the "Practice Management Settings" tab under "Appointment & Calendar" menu on the left hand navigation as shown in the screenshot below.
Chrome Extension installation
For most cloud-based practice management systems, you will need to install a version of the NexHealth Synchronizer Chrome Extension. Please note that the Chrome extension must be installed on all workstations where staff members make changes to the schedule including creating new patients/appointments and editing existing patients/appointments.
Mass deployment to a large number of workstations is available if the client uses a remote management software (RMS) that can deploy a .exe file on all their machines or a Group Policy Object (GPO). Instructions will vary depending on the integration and institution. Please reach out to [email protected] for next steps.
For manual installation, please use the following steps:
- Click on the Chrome Extension link for the correct practice management system, then click Add to Chrome (and Confirm on the next screen).
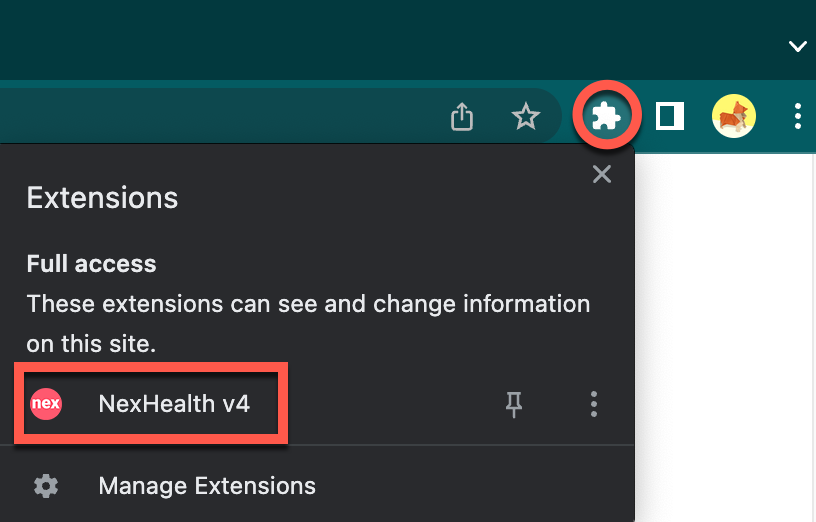
- Once you have added the extension, activate it by clicking into your available extensions on the top right corner of your Chrome browser and selecting NexHealth:
-
You should have received a unique token for each practice from NexHealth. If you need help obtaining a token, please contact [email protected].
-
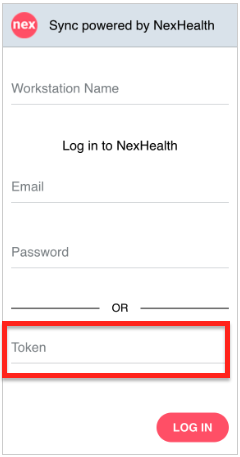
Enter the customer’s token at the bottom of the login screen:
-
Be sure to perform the installation on all practice workstations.
FAQs
Cloud-based systems
Can I use any existing user for the NexHealth sync?
To prevent delays, offices should provide a dedicated user (meaning the username is not used by any person or automated process). The NexHealth team reserves the right to update the provided password to ensure better security. Therefore, if a person or process continues to log in with the old password, the website will automatically inactivate the user. If these two criteria are not met, we may not be able to move forward with the integration.
Why do I need to install the Chrome Extension?
The Chrome Extension provides a true real-time sync which will pick up new patients, appointments, cancellations, reschedules, etc. instantly.
Where do I need to install the Chrome Extension?
To ensure that the Synchronizer picks up all changes to the practice management system in real-time, the Chrome Extension needs to be installed on ALL workstations where anyone makes changes to the system (ex: new patients, new appointments, rescheduling appointments).
Updated 9 days ago