Using the NexHealth Developer Portal
Easily onboard practices that will sync with your app via the NexHealth Synchronizer.
Accessing the NexHealth Developer Portal
Creating an account:
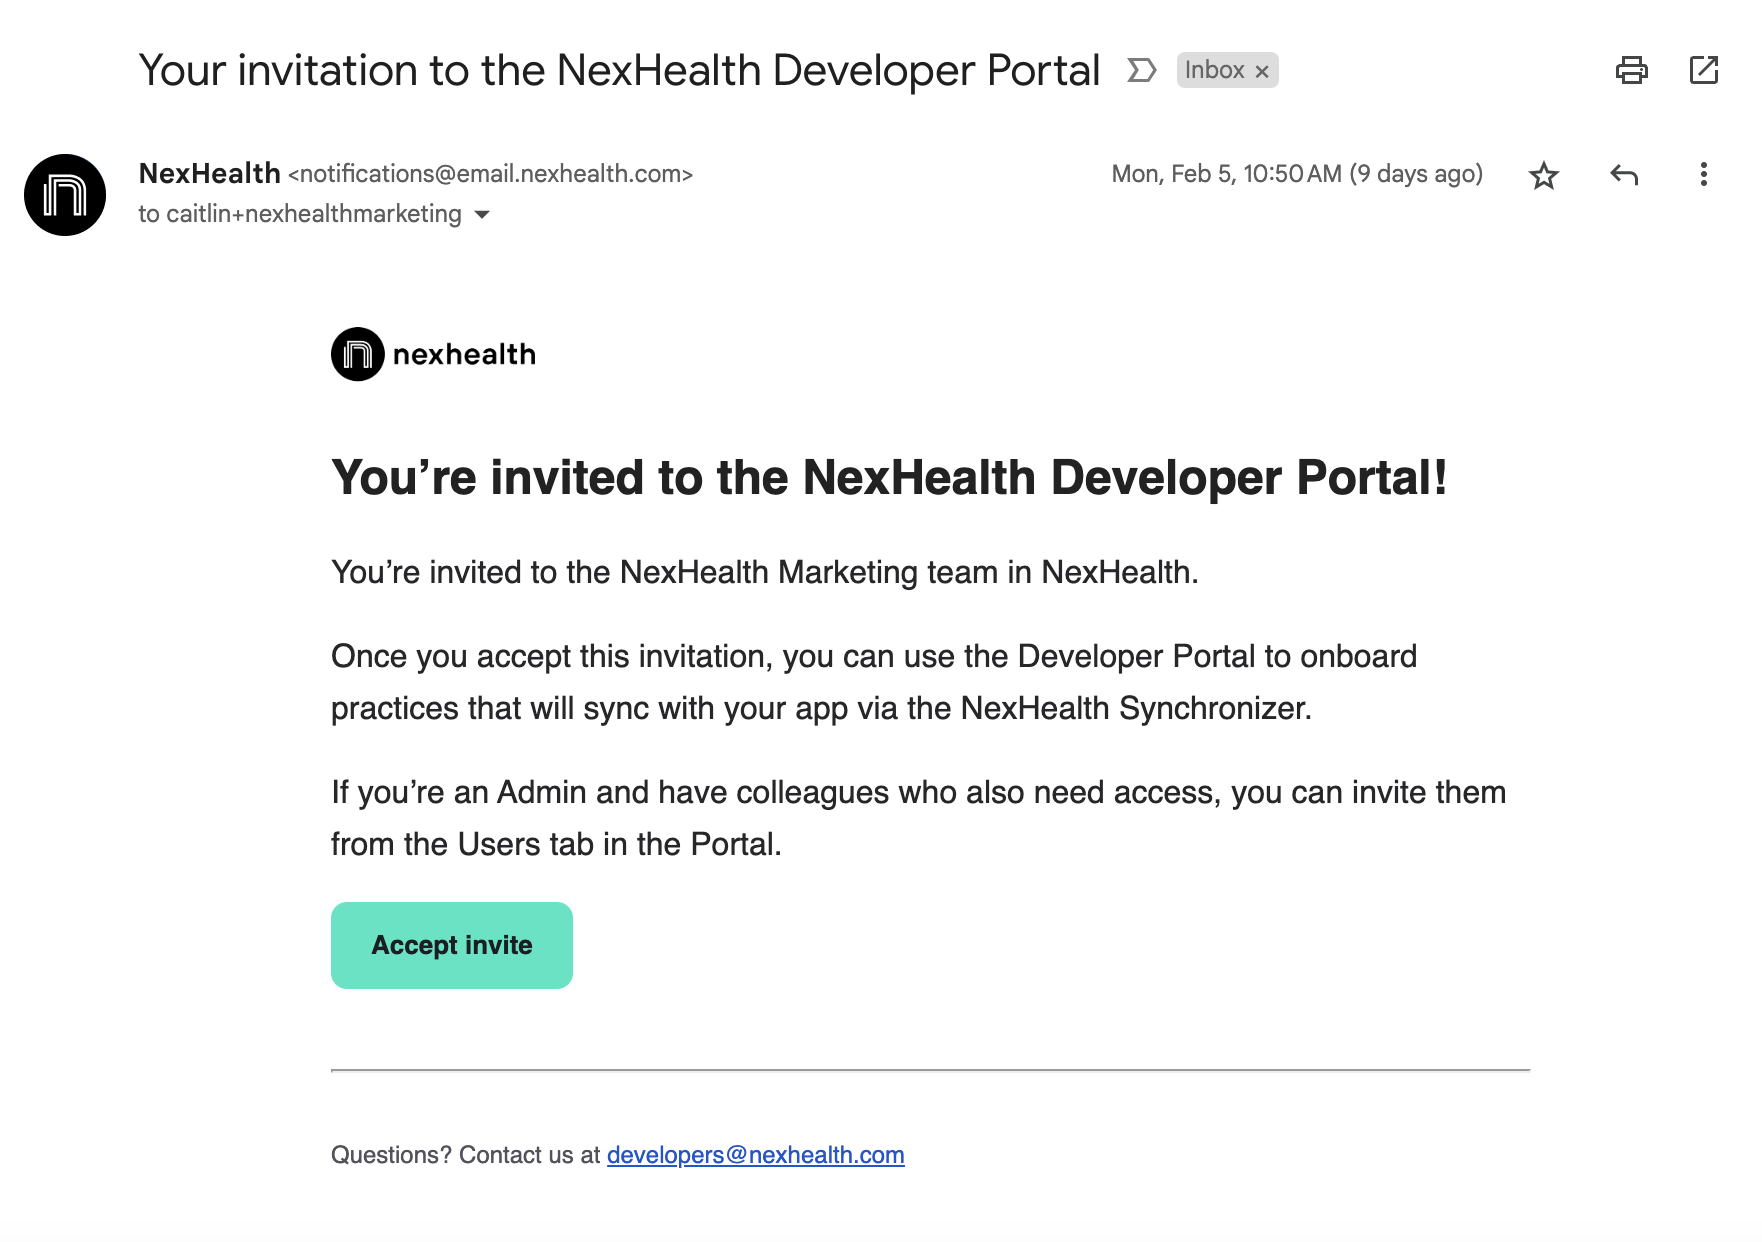
You will receive an email with the subject line "Your invitation to the NexHealth Developer Portal" from [email protected] inviting you to create an account for the Developer Portal. If you don’t receive an email, please email [email protected].
Logging into to the Developer Portal:
After clicking "Accept Invite" from the email invitation, you'll be prompted to create a password. You can then log into the Portal using your new credentials.
You can log into the Portal at developers.nexhealth.com or via the general login page, which can be accessed by visiting our website, nexhealth.com, and clicking the "Login" button in the top right corner.
Managing users
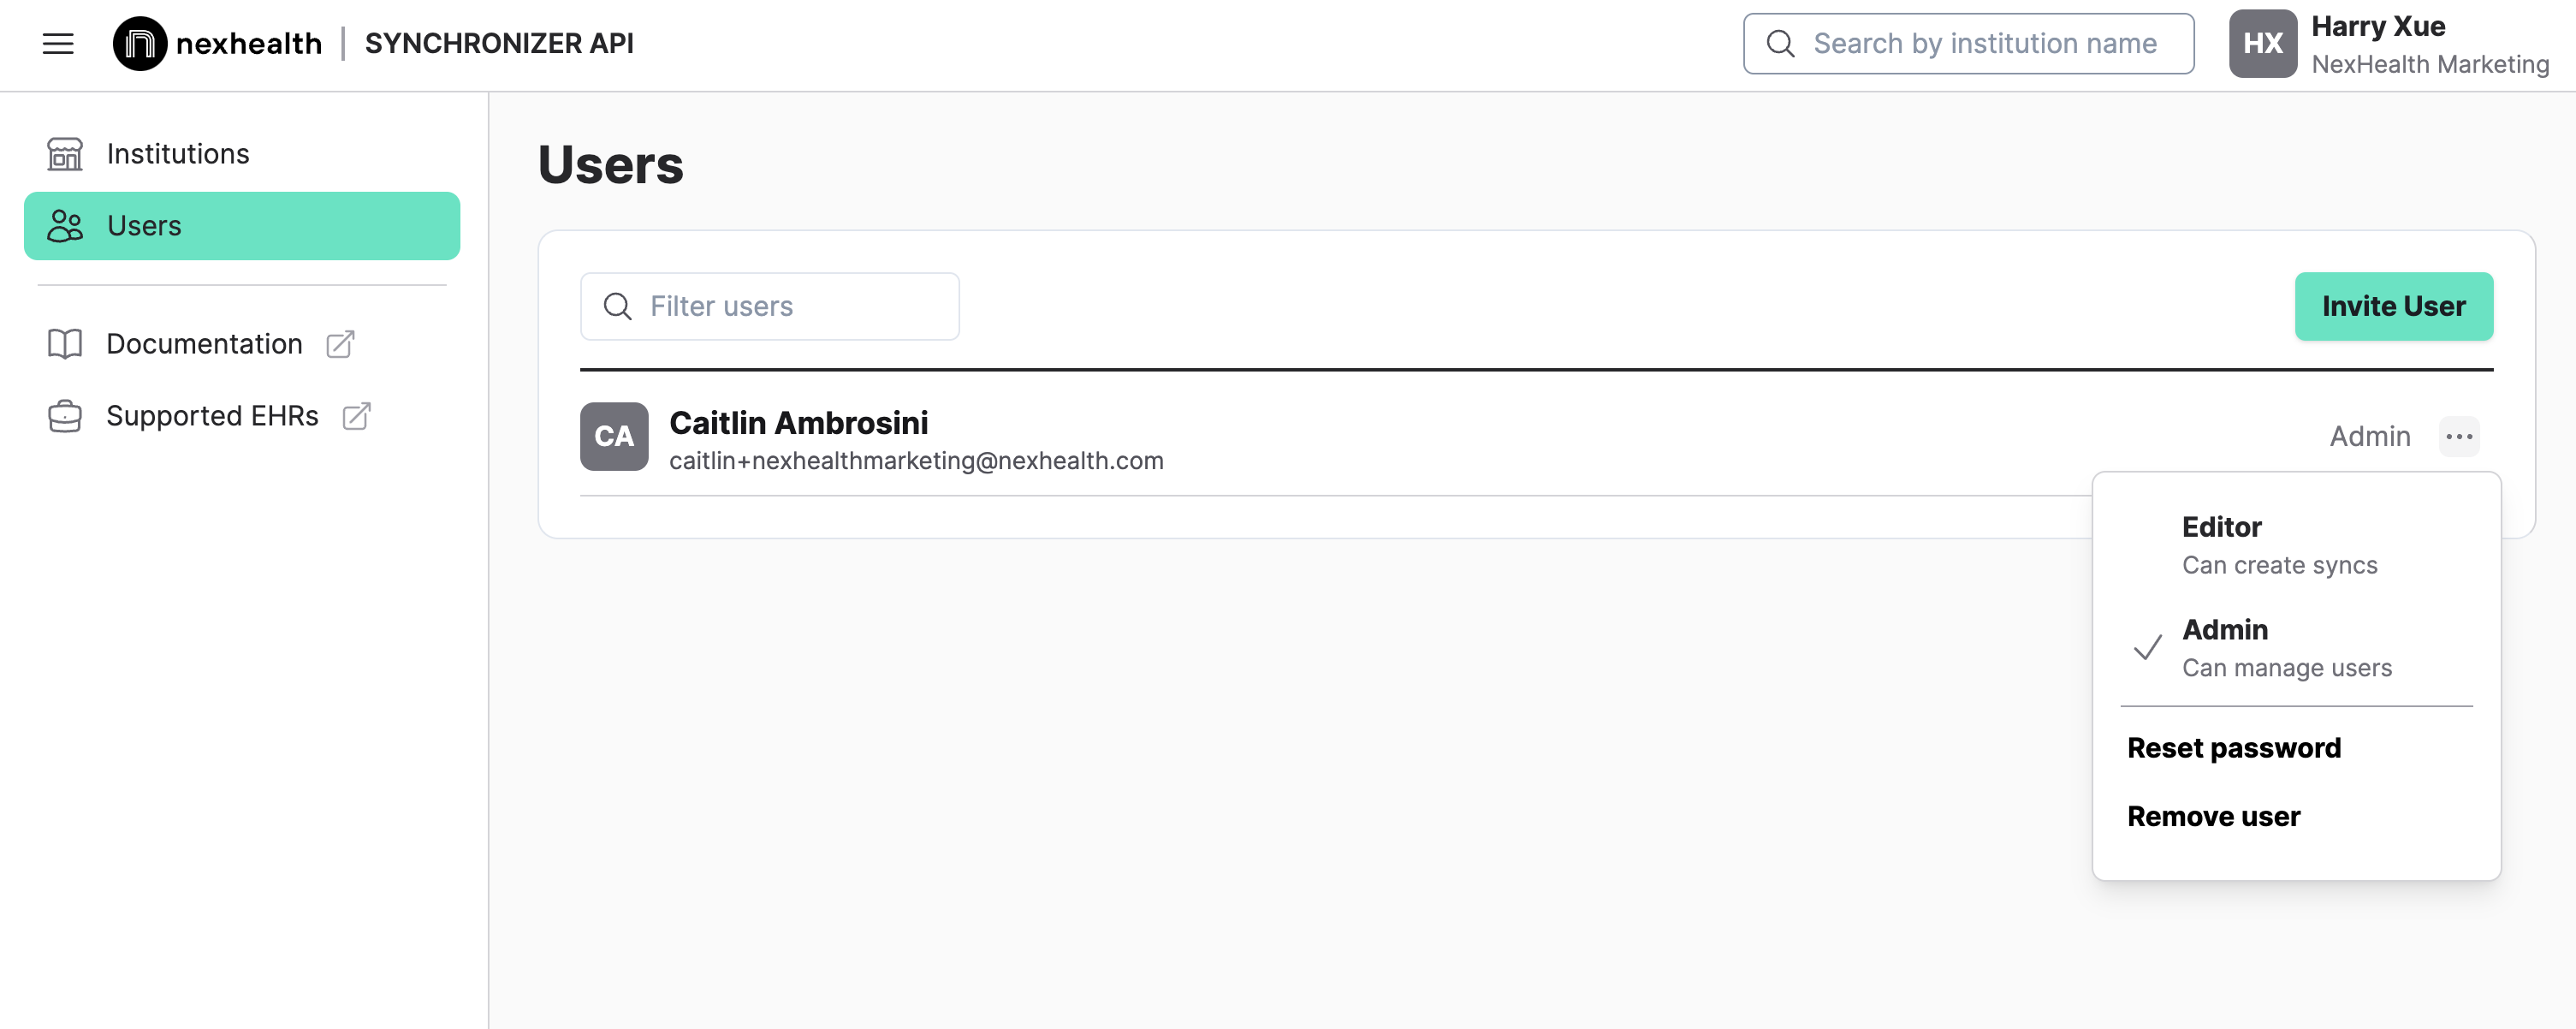
Use the navigation bar on the left sidebar of the Developer Portal to access the Users tab. You can invite users to the Developer Portal by clicking "Invite User" and entering their email. The new user will then receive an email invitation to the Portal.
You can also mark a user as an Admin, which will allow them to manage and invite other
users to the Portal. Admins are also able to delete users in the Portal.
Click the three dots to the right of a user invite to either resend or cancel the invitation.
The NexHealth Developer Portal at a glance

When you first access the portal, you will see any existing Institutions in the center of your screen. You can also use the top right search bar to locate an Institution by name.
Your Institutions will be displayed in the following categories.
- TO DO: Institutions in this section require an action item from you. For example, starting the installation, selecting locations, or providing credentials.
- IN PROGRESS These Institutions have started the Synchronizer installation process, but may need additional information or action. You may also see a failed state in this section.
- ALL: This section contains a comprehensive list of all of your Institutions.
If you’re managing several Institutions, use the “Filter by” button to sort your Institutions by status and see your outstanding TO DO items quicker.
Use the left sidebar to access your Users tab. Here, you can invite new users from your organization using the “Invite Users” button. See more on managing users at the end of this page.
You’ll also find links to docs and more information on supported health record systems in the sidebar.
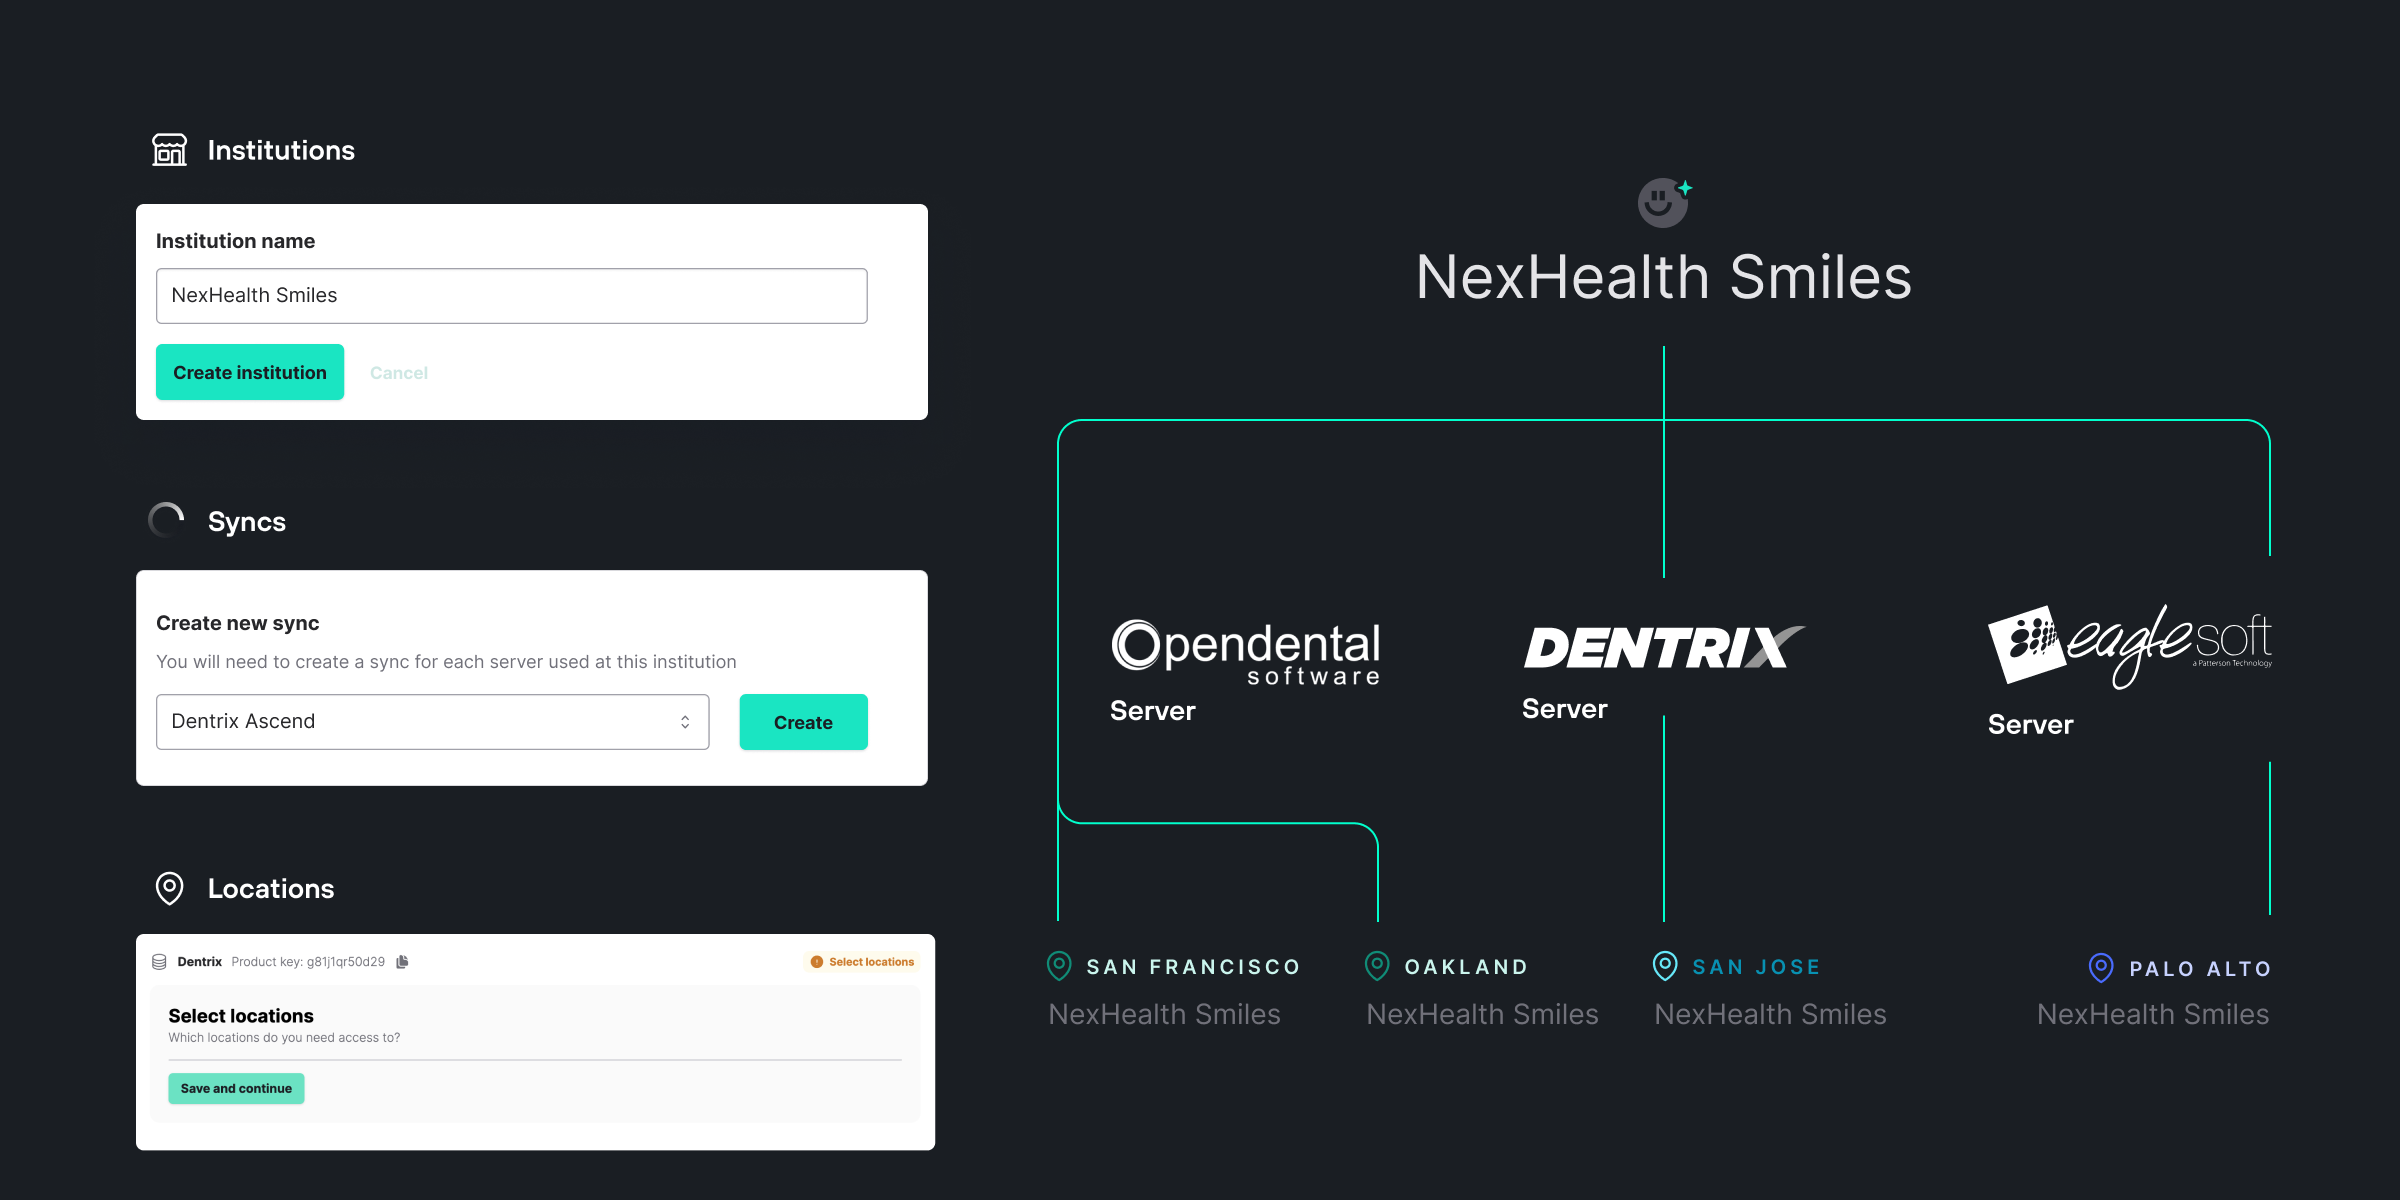
Creating an Institution

- Click "Create Institution" in the top right corner of the Portal.
- Enter relevant information for the Institution, including its address, contact information, and website.
- If the Institution is a multi-location group, such as a Dental or Medical Service Organization, please enter the information for the parent organization or corporate office.
- You’ll see the created Institution in the TO DO section of the Portal. The next step is to install the NexHealth Synchronizer.
Installing the Synchronizer

- After creating an Institution, you will see a call to action to "create sync" next to that Institution in your TO DO section of the Portal. Click on "create sync" to start the installation process.
- After clicking into the Institution, select the practice’s health record system from the dropdown and click "Create". Please note that you will need to install the Synchronizer for every server within a given Institution if that practice is using an on-prem health record system such as Dentrix or Open Dental.
- If you are setting up an on-prem sync that is supported by the self-installer, the Developer Portal will display a product key for the Synchronizer installation. The product key is a unique identifier for each installation that links the practice’s health record system to the Synchronizer.
- If you are setting up an on-prem sync or a cloud sync not supported by the self installer, please follow the installation steps for your customer’s health record system in this guide.
See more information on how to handle Institution creation failures.
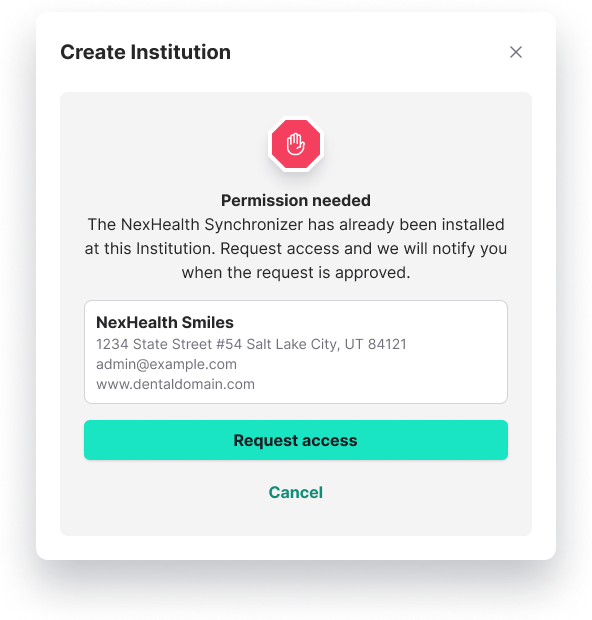
What to do if you encounter a matching Institution
Some practice locations may already have the Synchronizer installed. This means you don’t need to install it again, but the practice must give consent for you to use their existing Synchronizer to read and write data to their health record system.
Here is what to do when you encounter a matching Institution.
Matching: You will be notified during Institution creation that a specific Institution is already live with the Synchronizer, eliminating the need for the installation step. You will see a pop up modal on your screen indicating a match has been detected. Confirm the match by clicking "Request access'". The practice will then need to provide consent for you to use their existing Synchronizer. They can provide consent via email or the NexHealth web app.
Practice consent: If a practice is already using the NexHealth Synchronizer, they will receive an email requesting they provide consent for you to use their existing Synchronizer.
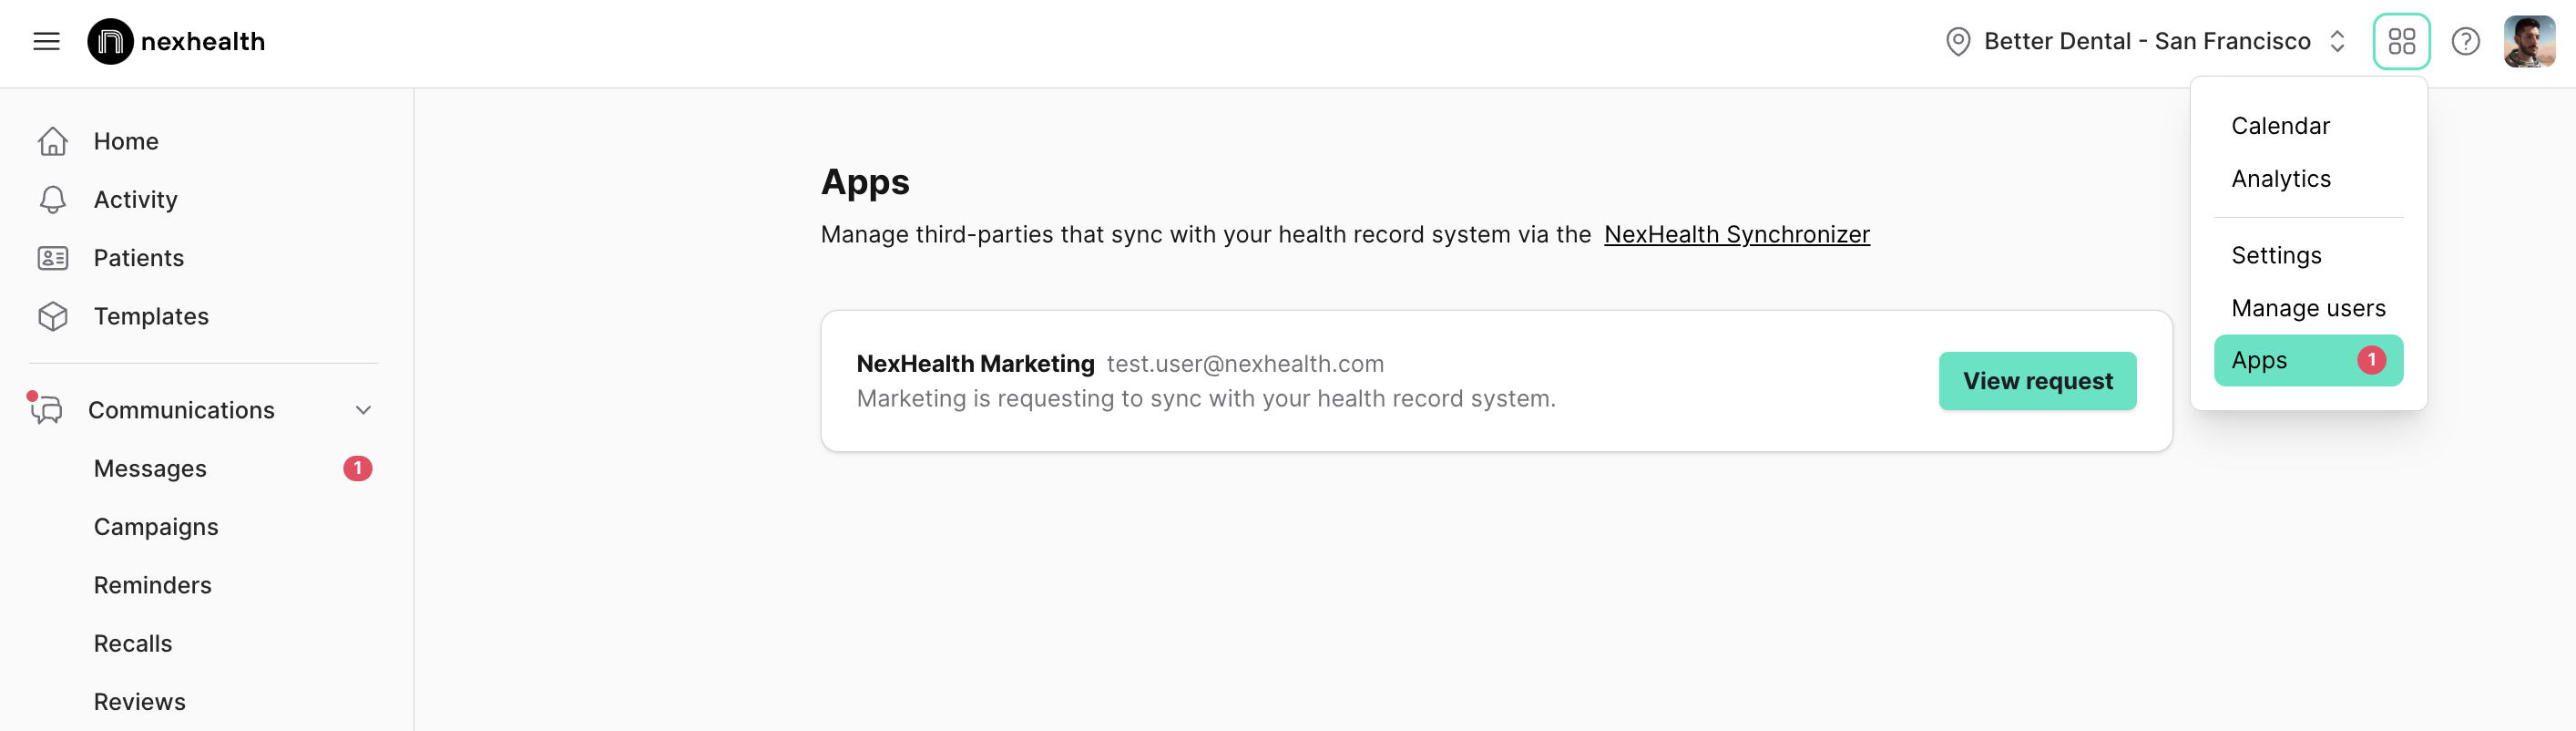
If the practice is using the NexHealth web app, they can then grant access directly from their web app. If the practice needs help, instruct them to navigate to the four squares at the top right of their NexHealth account, click Apps, and grant access.
If the practice is not using the NexHealth web app, they can grant access by responding to the email.
Once the practice approves the request to sync, you can continue.
Bulk uploads
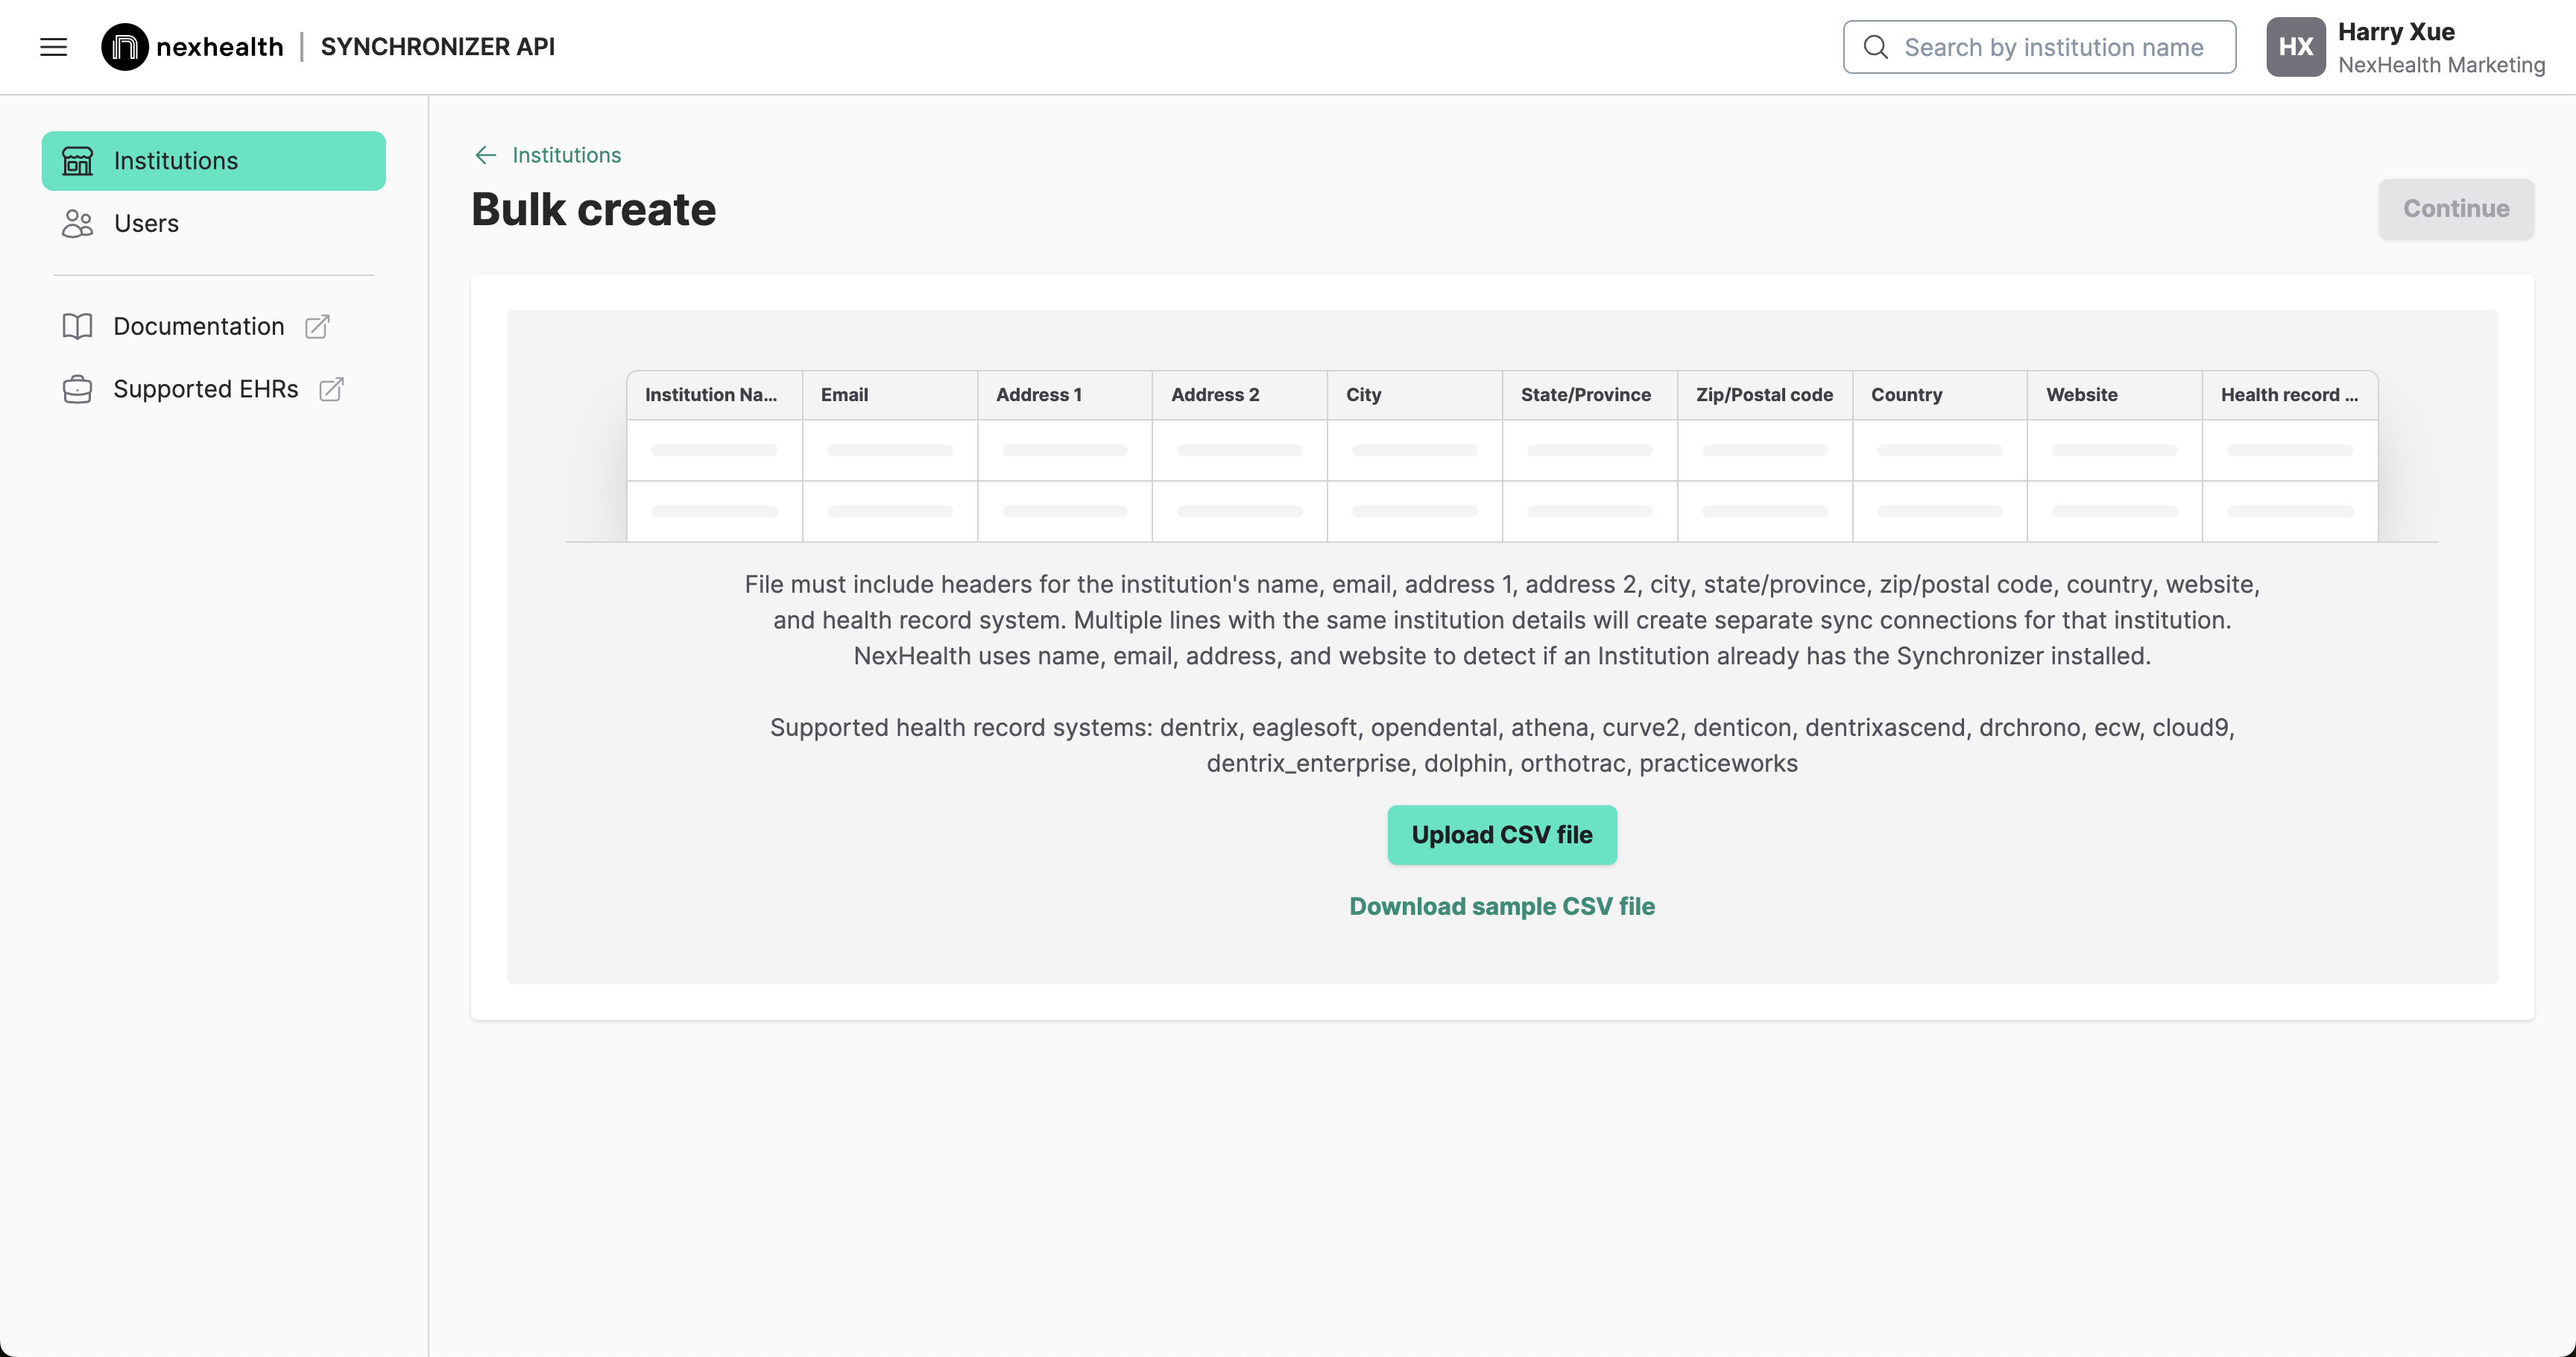
If you are creating multiple Institutions and syncs at once - for example, migrating multiple offices off a previous service provider - use the "Upload CSV" button in the upper right to save time in submitting practice information. Download a sample CSV to ensure you use correct formatting. Keep in mind that using multiple rows with the same Institution information is the way to create multiple syncs for that Institution.
You will receive an alert in the Portal if there are any existing matches with practices that already have the Synchronizer installed. See more information on matching above.
Updated 13 days ago