Installing the NexHealth Synchronizer
Install steps for server-based and cloud health record systems, with fixes for failed installs.
The NexHealth Synchronizer™ is the NexHealth software that lets healthcare practices sync their data with developers' apps.
First create an institution in the Developer Portal. Then follow the steps below to install the Synchronizer at the practice.
Compatible systems
| System | Versions |
|---|---|
| athenahealth | All (cloud) |
| Cloud9 | All (cloud) |
| Curve Hero | All (cloud) |
| Denticon | All (cloud) |
| Dentrix | G6.2+ |
| Dentrix Ascend | All (cloud) |
| Dentrix Enterprise | All (server) |
| Dolphin | All local (server only) *includes multi-clinic |
| Eaglesoft | 18+ (server) *includes n-site |
| eClinicalWorks | v11.53+ (cloud) *on-prem not supported at this time |
| Modernizing Medicine (ModMed) | All (cloud) |
| NextGen | All (cloud) |
| Open Dental | V17+ (server) *includes multi-clinic |
| OrthoTrac | All local (server only) *includes multi-clinic |
| PracticeWorks | All local (server only) |
On this page
- Your first installation
- Server-based systems with the self-installer: Dentrix, Eaglesoft, Open Dental
- Server-based systems: all others
- Preparing for a scheduled install
- Cloud systems installation: Athena, Cloud9, Curve Dental, Dentrix Ascend, Denticon, eClinicalWorks, ModMed, NextGen
- Chrome Extension installation
- Troubleshooting install failures
- FAQs
Your first installation
Read Getting to know a healthcare office first. It covers how to talk with practices and which questions to ask.
Server-based systems with the self-installer: Dentrix, Eaglesoft, Open Dental
This process applies to these systems:
- Dentrix
- Eaglesoft, single location and multi-location ("n-site")
- Open Dental, single clinic and multi-clinic. Middle-tier setups need scheduled time with a NexHealth engineer.
For each practice on a server-based health record system, the Developer Portal gives you a unique product key for the Synchronizer install.
If you need help getting the key, email [email protected].
You can reuse a product key if the install fails. You cannot reuse a key from a completed install.
Install the Synchronizer on the practice's server. Follow these steps.
- Create an institution. Follow Create the institution. If the institution already exists, see If the practice already uses NexHealth.
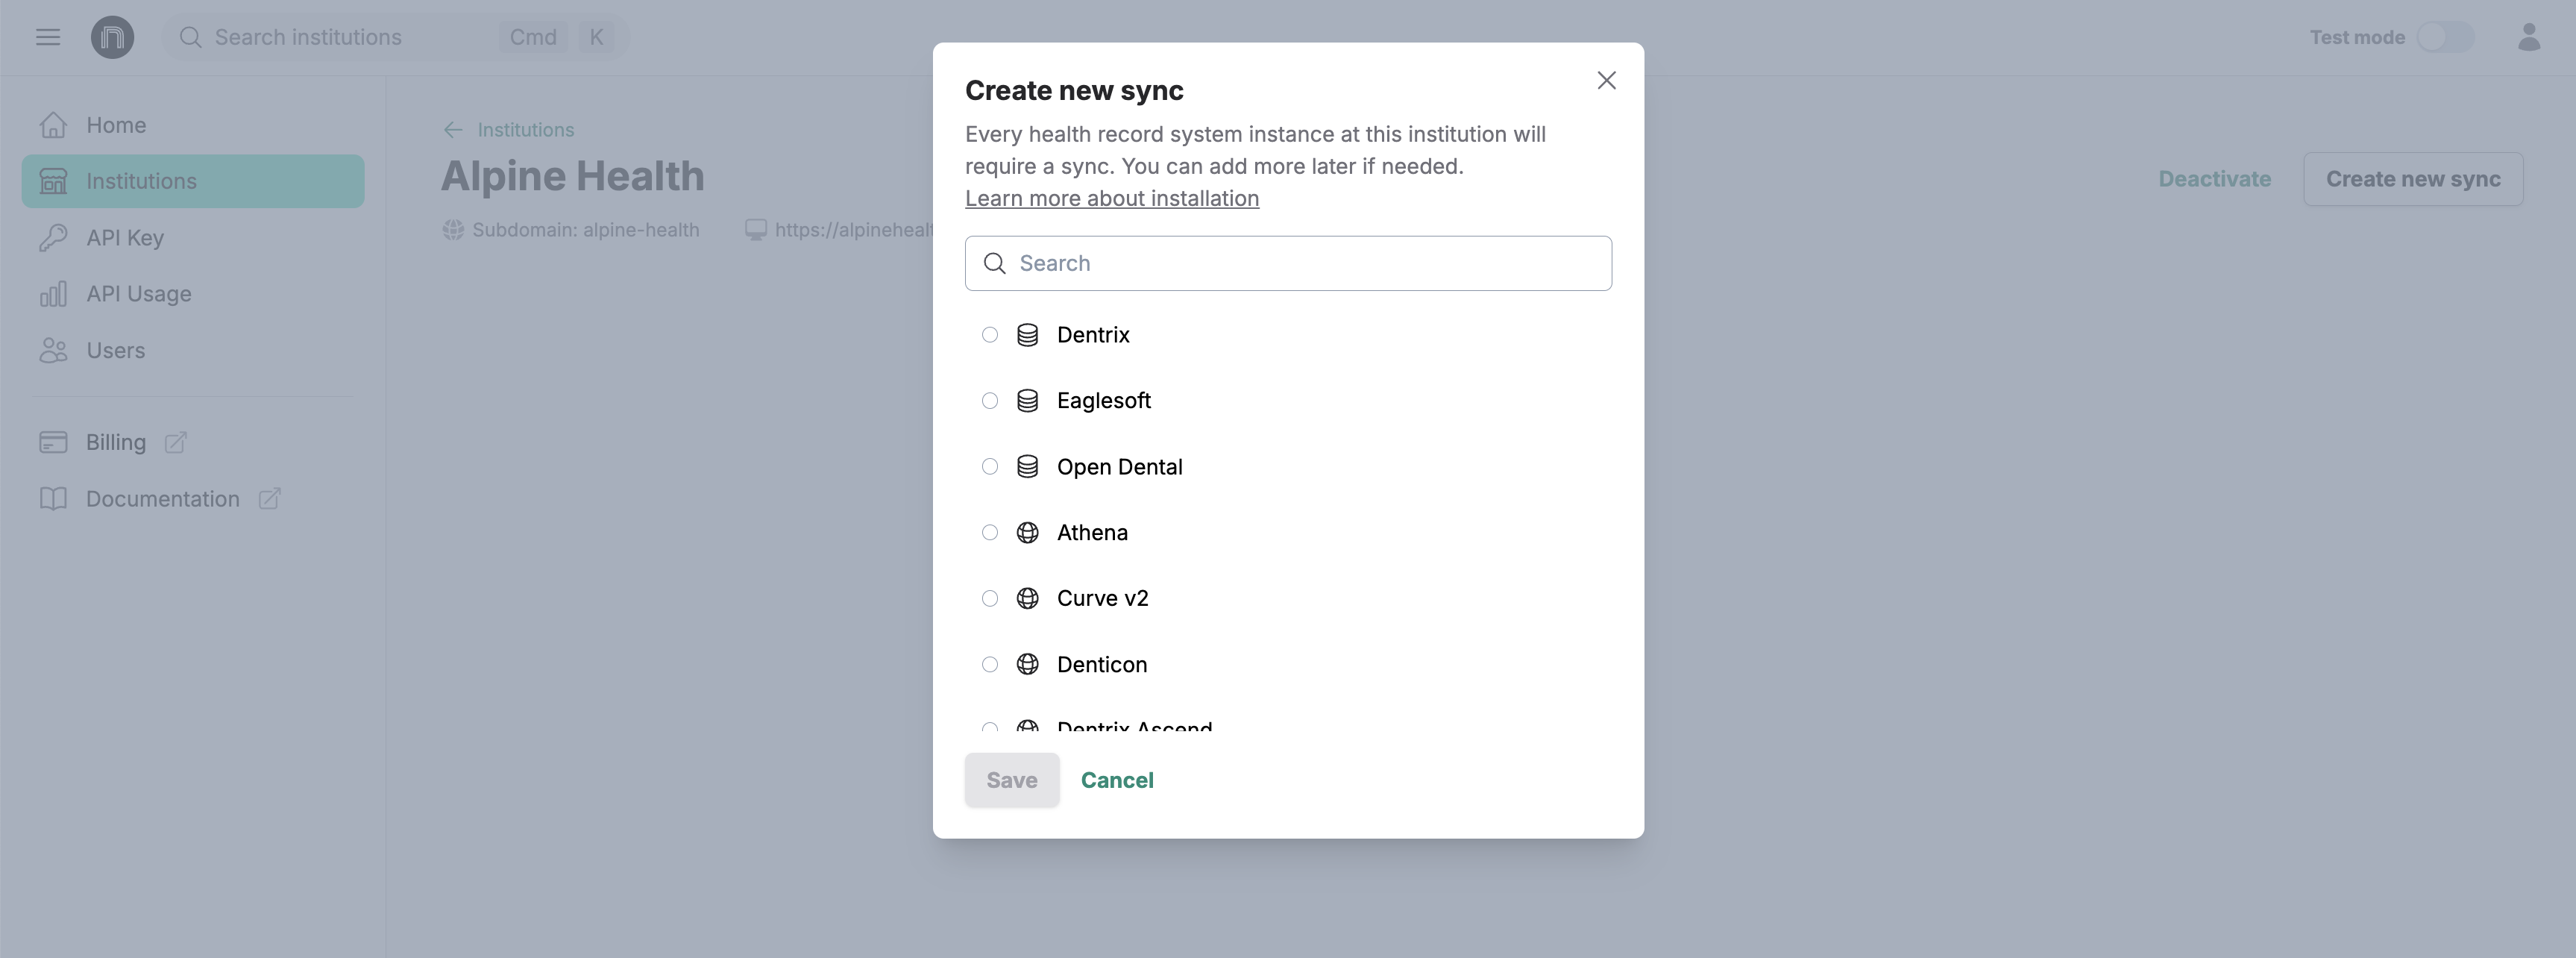
- Create a sync. For a new institution, choose the integration type in the drop-down menu of the window that appears. For an existing institution that needs a new connection, click Create New Sync.

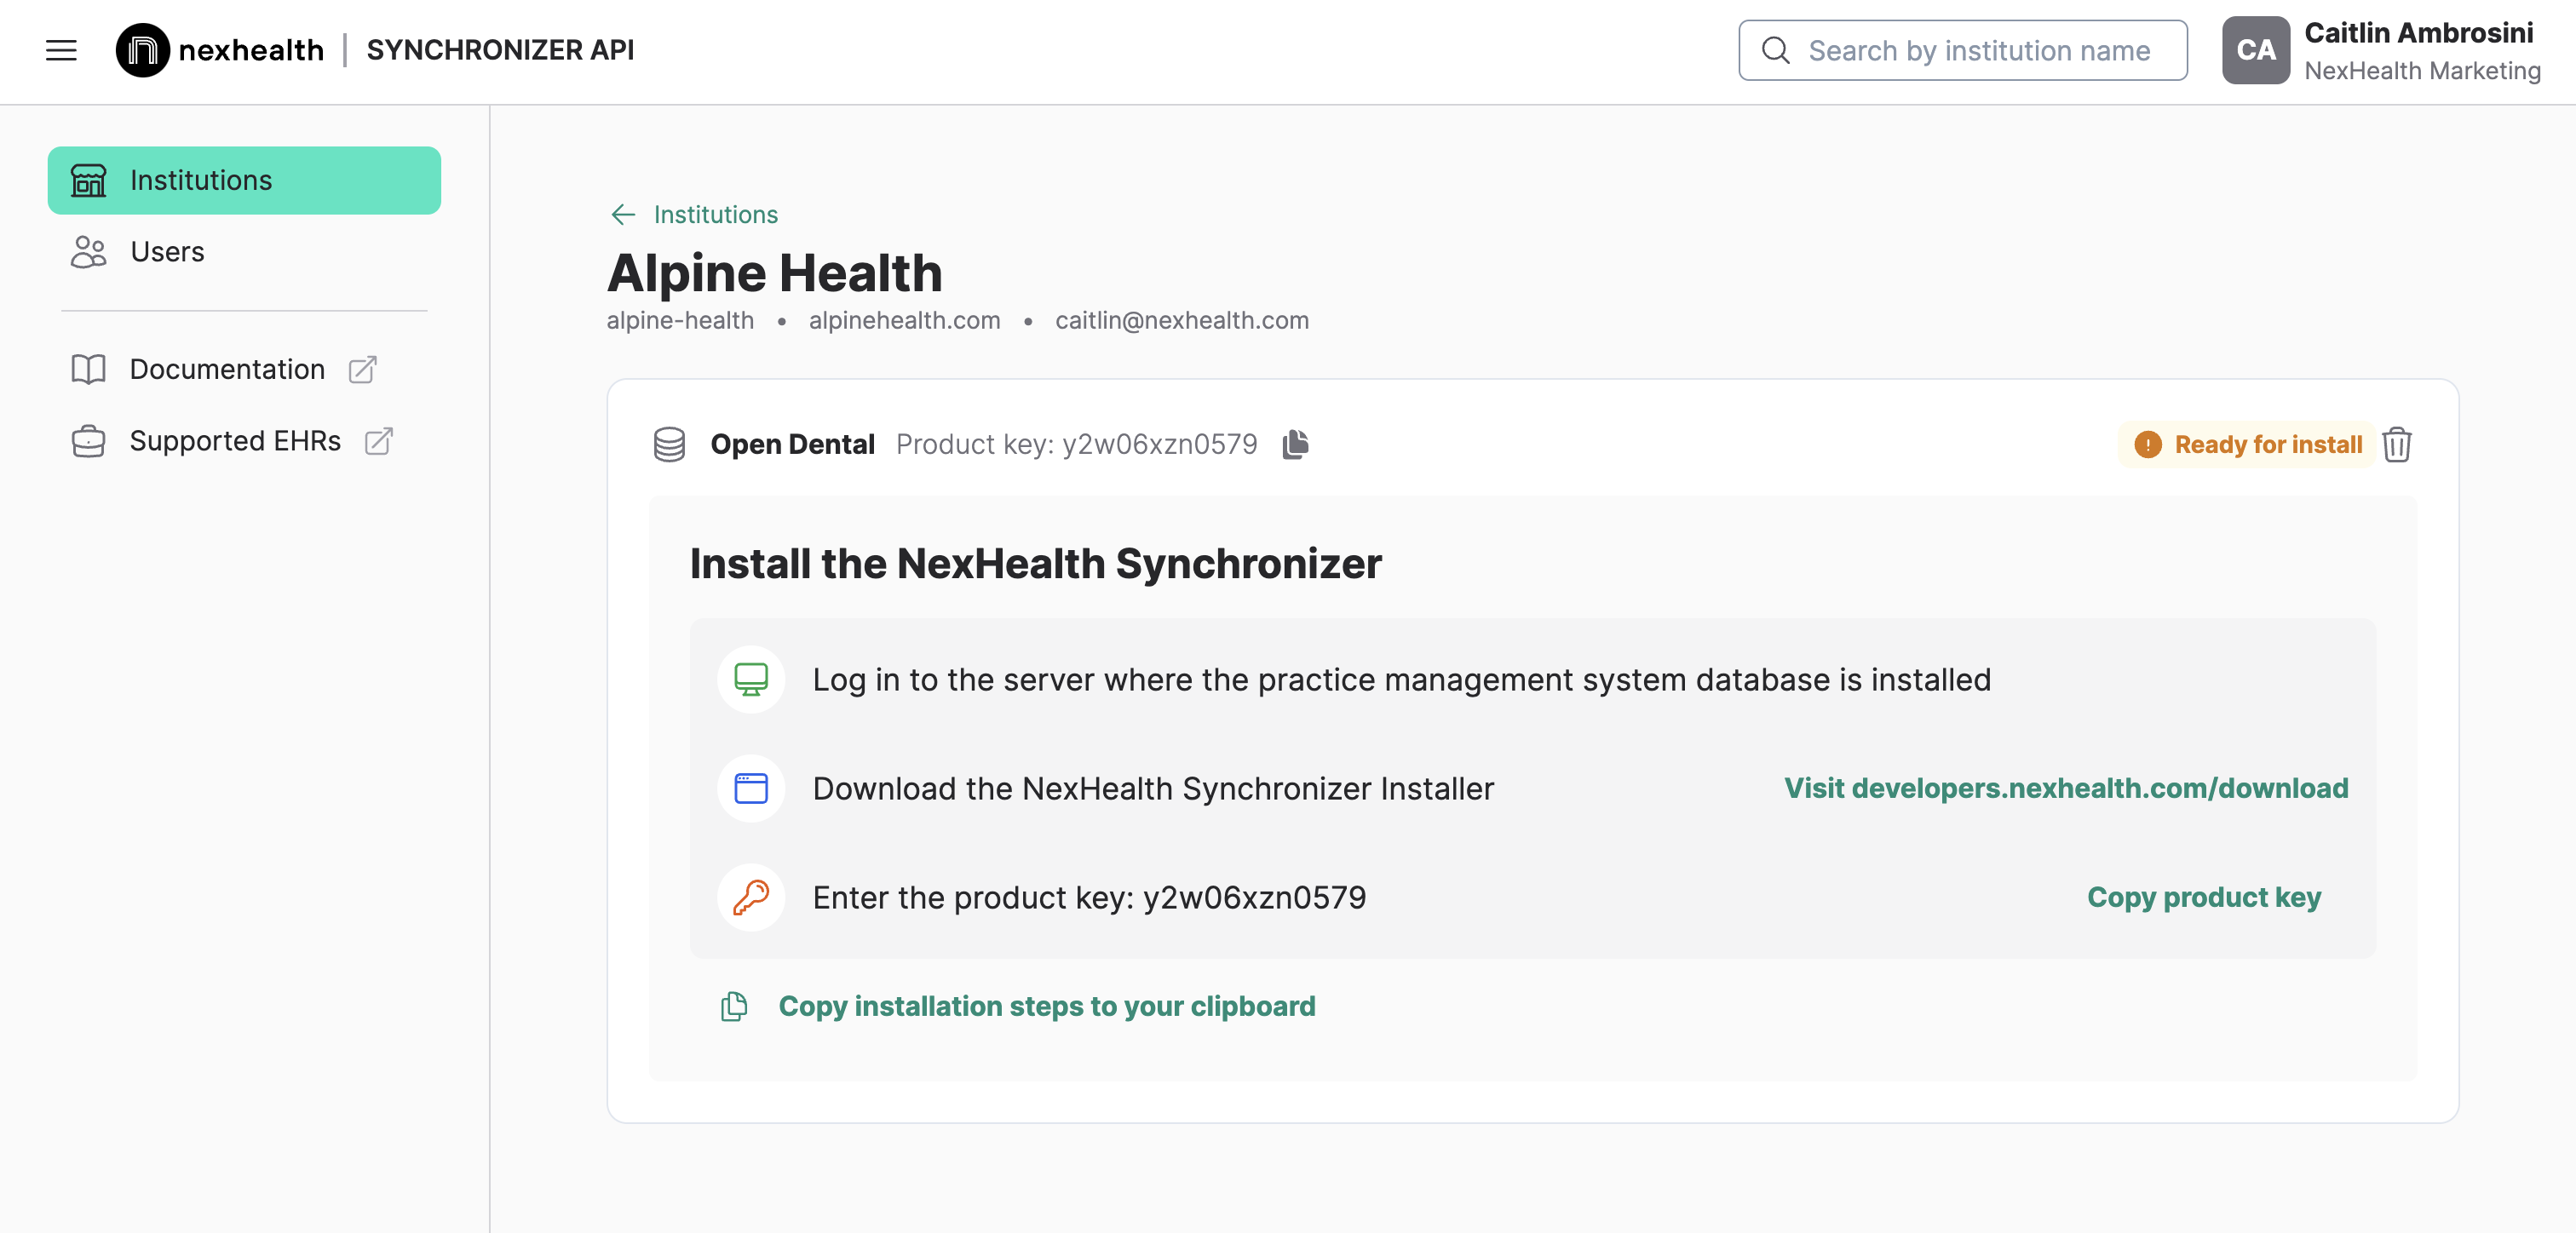
- Get the product key. After you create the institution, the product key is in the Developer Portal. If you do not have access to the practice's server, copy the instructions from the product key page and send them to an IT contact.
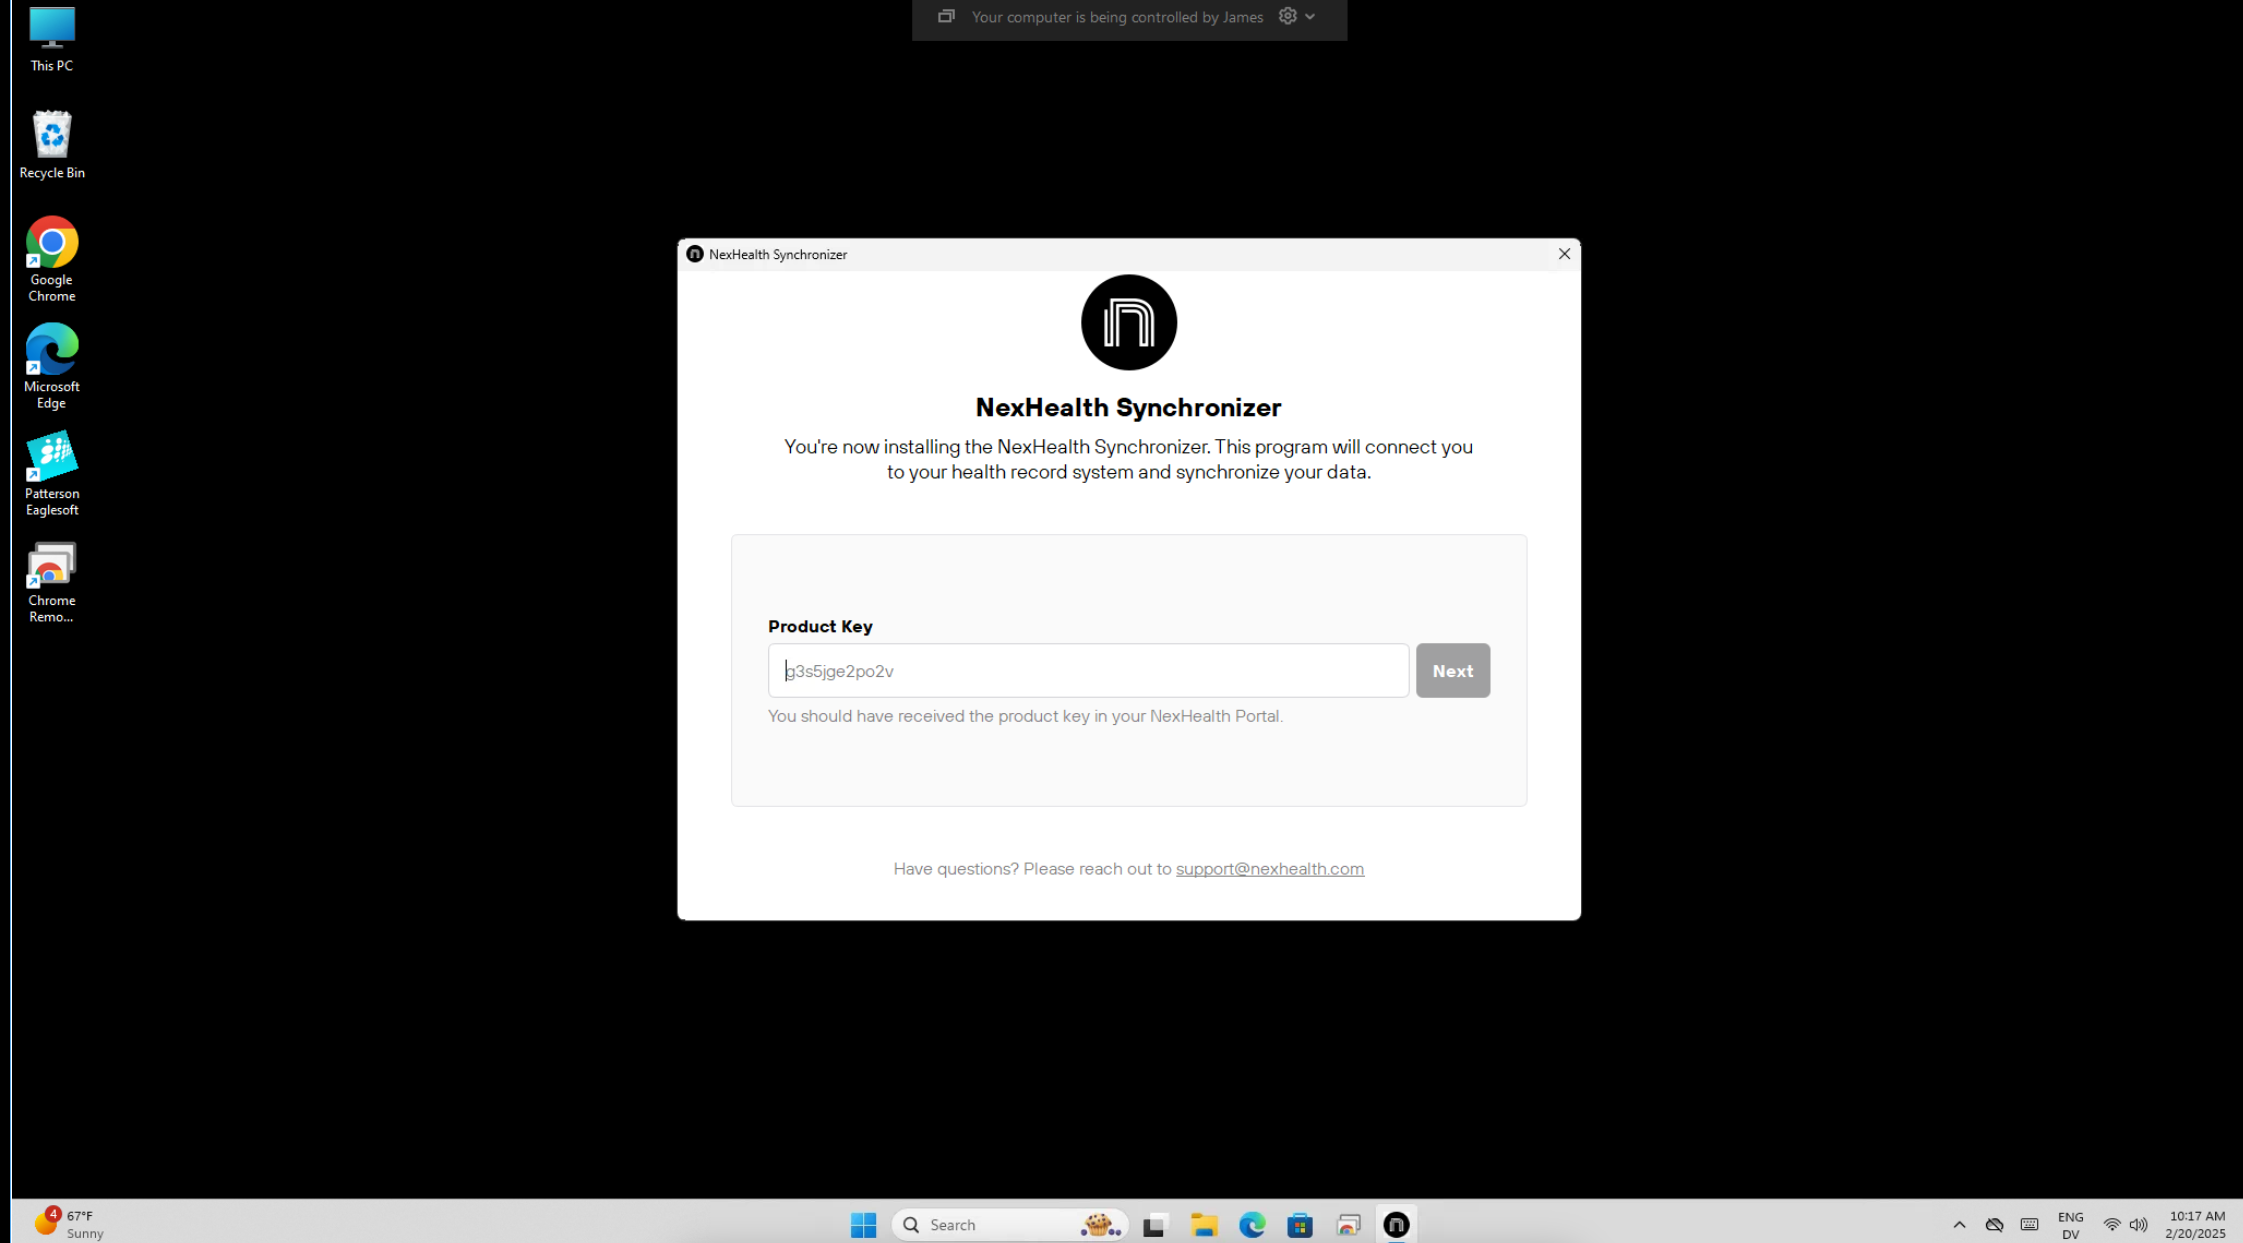
- Download and run the installer. Open the NexHealth installer link in a browser on the server or machine where the health record system database is installed. Log in to Windows with an account that has Administrator privileges, so the installer can install background services. The installer looks like this.
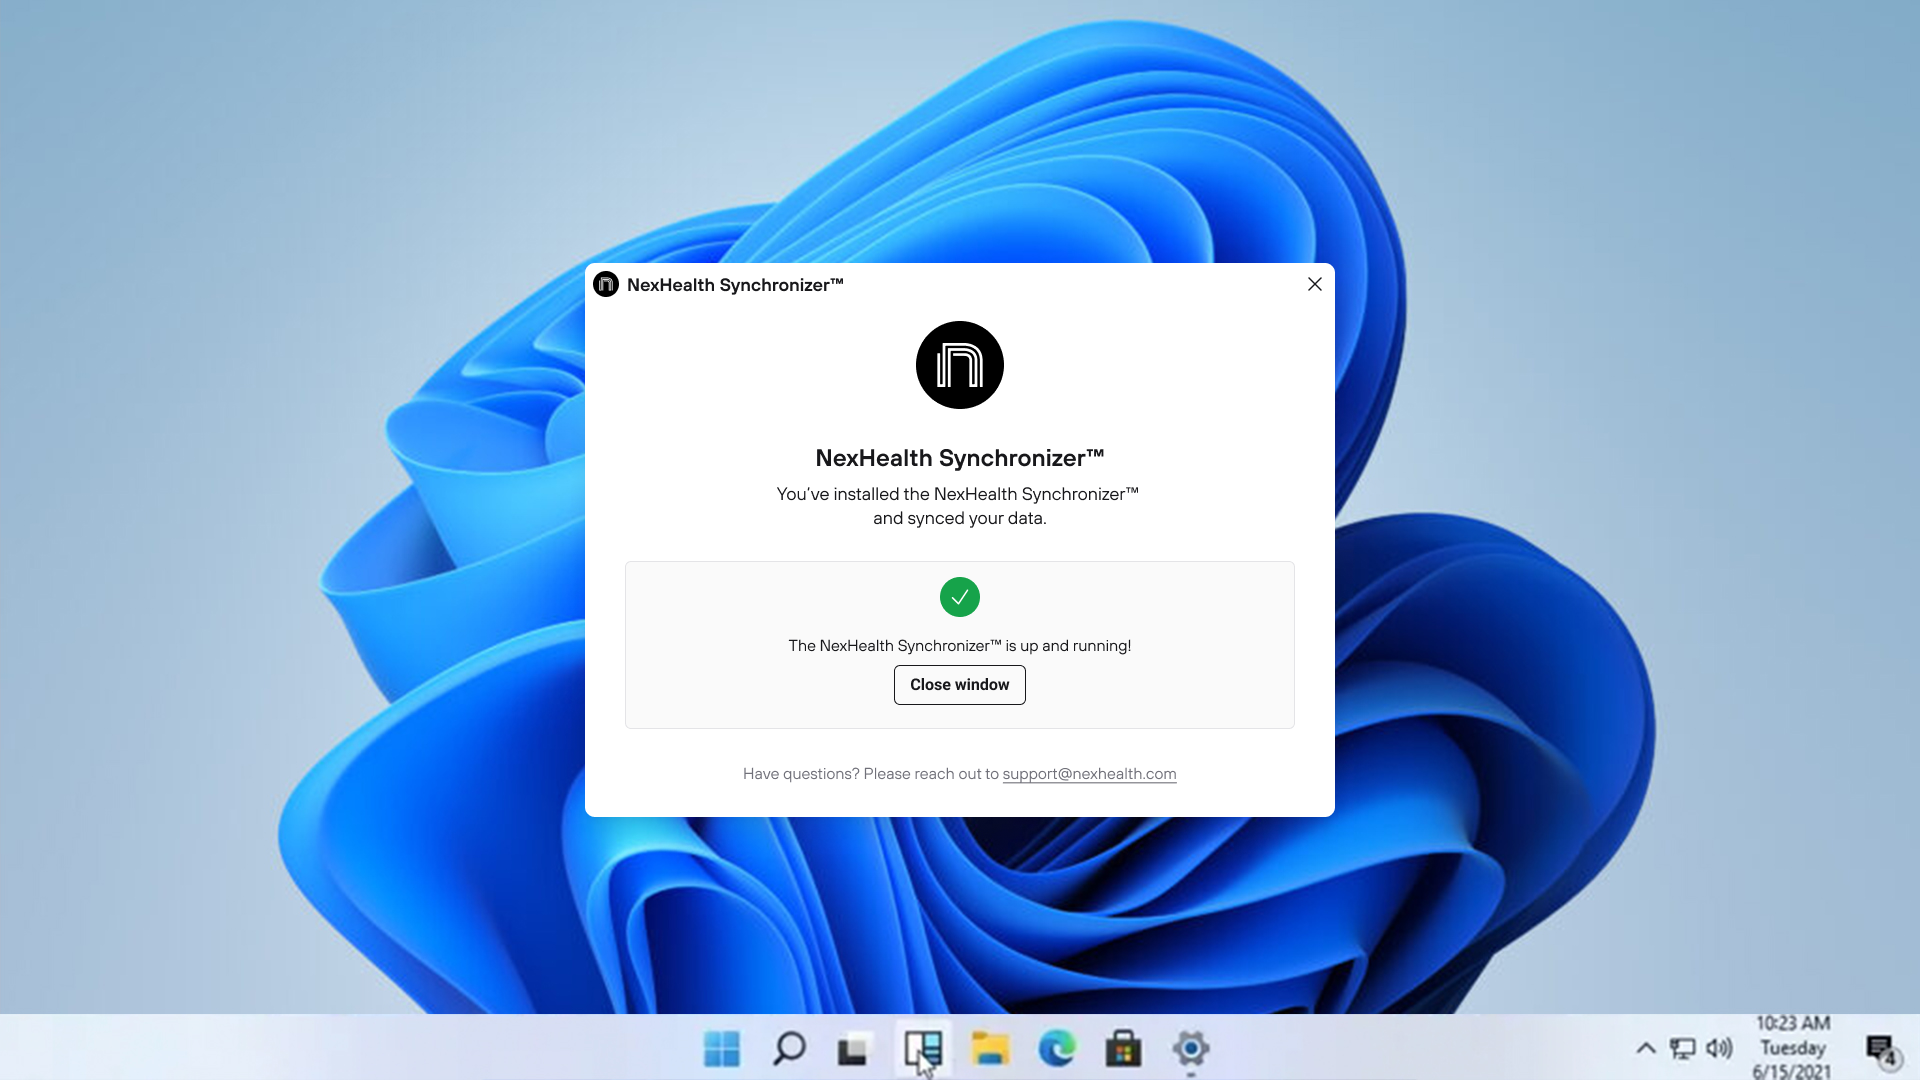
- Finish the installer. Enter the product key you copied from the Developer Portal. Each sync has its own key, so check that the key is for this sync. When the install finishes, the screen shows the message below. The institution status changes to "Select Locations" in the TO DO section of the portal.
- If a message says a Synchronizer is already installed on the machine, do not continue. Contact NexHealth Support.
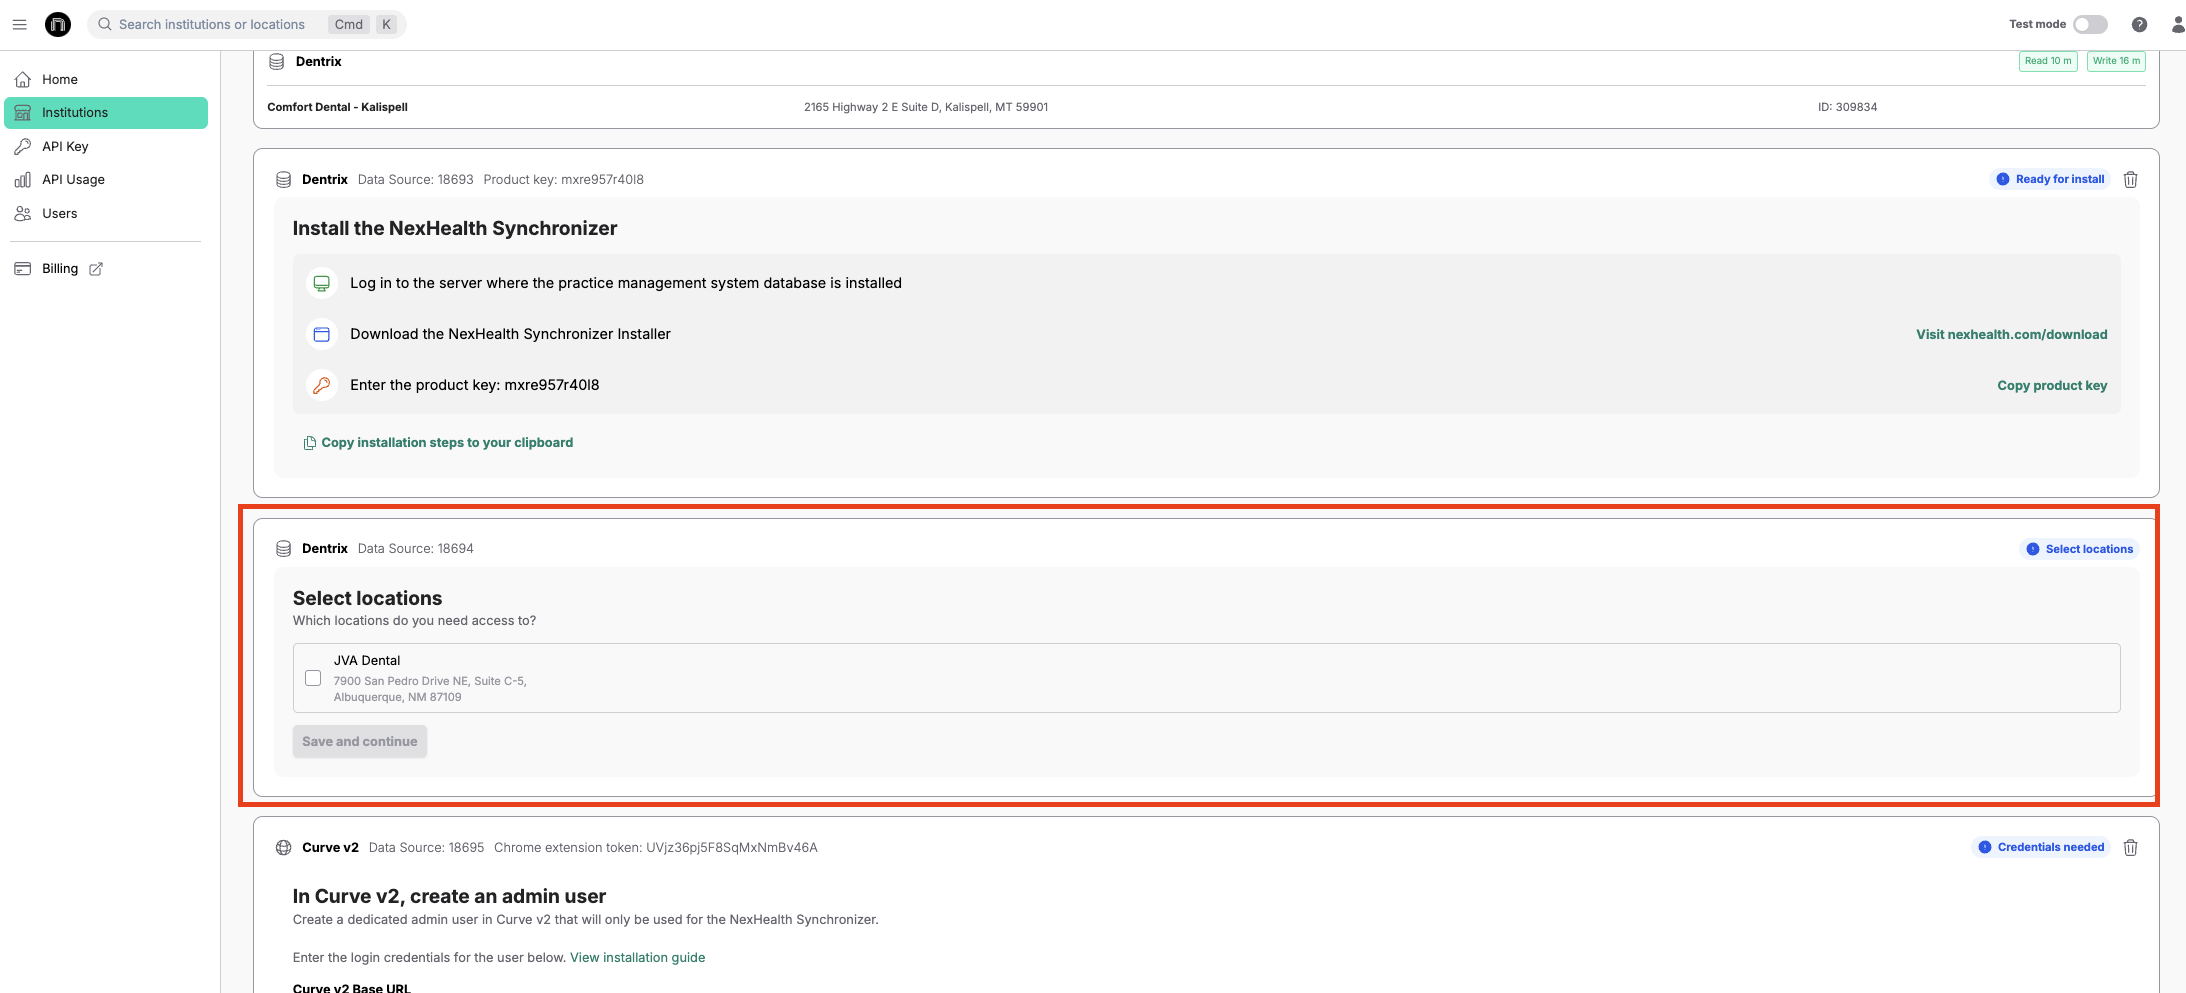
- Select locations. After the institution is created, the Synchronizer is installed and the historical read has run, the portal asks you to select the locations the Synchronizer reads data from. To work with only some locations in an organization, check the box next to each location name. You can select all or some of the locations supported by that server.
Server-based systems: all others
For server-based health record systems other than Dentrix, Eaglesoft and Open Dental, you create the sync in the Developer Portal first. Then you schedule the Synchronizer install with NexHealth.
- Create an institution. Follow Create the institution. If the institution already exists, see If the practice already uses NexHealth.
- Create a sync. For a new institution, choose the integration type in the drop-down menu of the window that appears. For an existing institution that needs a new connection, click Create New Sync.
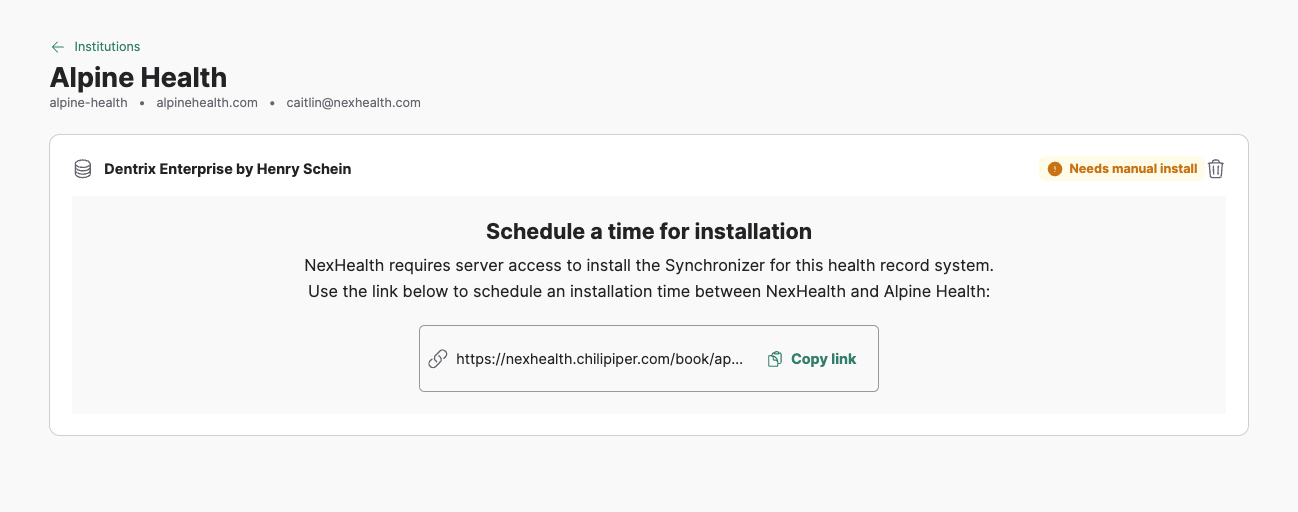
- Schedule the installation. After you select the health record system, the portal asks you to schedule an installation with a NexHealth engineer. Click the link to pick a time.
- Before the scheduled call, prepare the practice, and their IT if they have one, with Preparing for a scheduled install.
- If a manual install is needed and not yet scheduled, the institution shows in the TO DO section of the Developer Portal.
- Once the installation is scheduled, the institution moves to the IN PROGRESS section. The sync screen also shows that the installation is scheduled. You do not need to do anything else until NexHealth completes the installation.
- Install complete. When NexHealth completes the installation, the institution moves to the ALL section of the Developer Portal. The sync status changes to "Active" and the sync is ready to use.
Preparing for a scheduled install
A scheduled install is a call between the NexHealth installation team and the practice's IT. You book it in the developer portal. Our installation team communicates by email only.
Before the call, send the practice's IT:
- An overview of the service you provide
- A copy of your BAA, or proof that one is signed with the right parties
- Why we need server access
- What tables and data we read or write
IT needs to be ready to do these tasks on the call:
- Dentrix Enterprise: create a SQL user, or provide existing user credentials to SQL Server Management Studio.
- Dolphin and OrthoTrac: create a SQL user, or provide existing user credentials to Microsoft SQL Server Management Studio. The user needs
db_ownerpermission,publicpermission, and a mapping to theMain_OMSdatabase. - All systems: whitelist the ports, file paths and domains listed under Troubleshooting install failures.
Why we need server access. NexHealth installs its services on the hosting server, or on another machine on the network. We also need UI access to the health record system to check the connection once it is set up.
Remote access. NexHealth uses ConnectWise for remote access. At the start of the call we give IT a URL and a code to start the session. We disconnect when the install and QA are done.
How the Synchronizer works. It uses a SQL user to query the database roughly every 10 minutes for new data. It writes back in near real time.
What we read and write. By default we ask for the widest permissions allowed, so you can use all current and future API features. We can provide a list of tables and SQL user permissions cut down to your needs. If you choose that, permissions may need to change when you add features later.
Cloud systems installation
For each practice on a cloud-based health record system, you set up a user account in the system for NexHealth. You also install a Chrome Extension on every practice workstation that accesses the system. You may need to reset the password of the new user at first login.
The Developer Portal gives you a unique token. The practice uses it to sign in to the Chrome Extension. If you need help getting a token, email [email protected]. Cloud-based installs do not need a product key.
These are the general steps for a cloud-based sync. Steps for each system follow.
- Create the institution and the sync in the portal. Then submit the practice's unique health record system URL and the admin credentials of the new user you created.
- A NexHealth engineer installs the Synchronizer with those credentials. Allow up to 72 business hours. Installs for several locations can take longer. Test the credentials before you submit them and confirm that they log in.
- If the credentials do not work, NexHealth sends a notification to the Developer Portal.
- When the Synchronizer is running, the institution and the sync move to the "Active" state in the portal.
- Tell the practice or their IT provider that the NexHealth Chrome Extension must be installed on every computer that accesses the health record system. The extension token for the sync is in the portal. Each sync has its own token, so use the token for that sync.
Athena
- Create an athenahealth username and password for a dedicated user account that only NexHealth uses.
- Give the user account access to all Roles. Click the Roles tab on the new user, click edit roles, then click Select All. At a minimum, the user needs all schedule admin, department, provider and patient chart roles.
- Install Chrome Extension v6 for athenahealth on each practice workstation that accesses the health record system.
- Use the token from the Developer Portal to sign in to the Chrome Extension on each workstation.
Cloud9
-
Create a Cloud9 username and password for a dedicated user account that only NexHealth uses.
-
Give the user account access to all Roles. Click the Roles tab on the new user, click edit roles, then click Select All. At a minimum, the user needs all schedule admin, department, provider and patient chart roles.
-
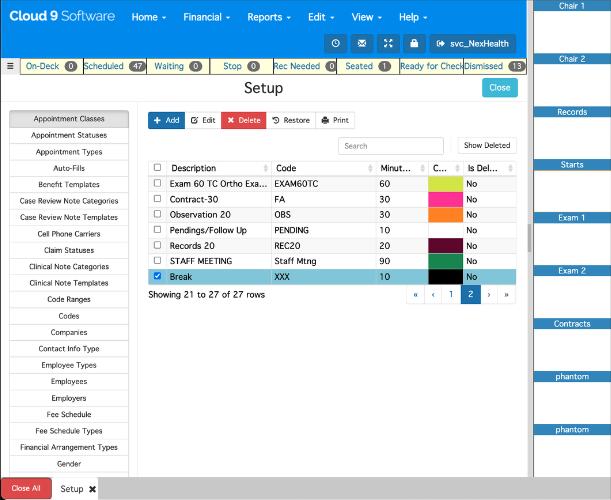
If you use online booking, note every "Appointment class" that should count as unavailable for scheduling. In the screenshot below, the "break" appointment class is unavailable time. Tell NexHealth developer support when you submit your installation request.
-
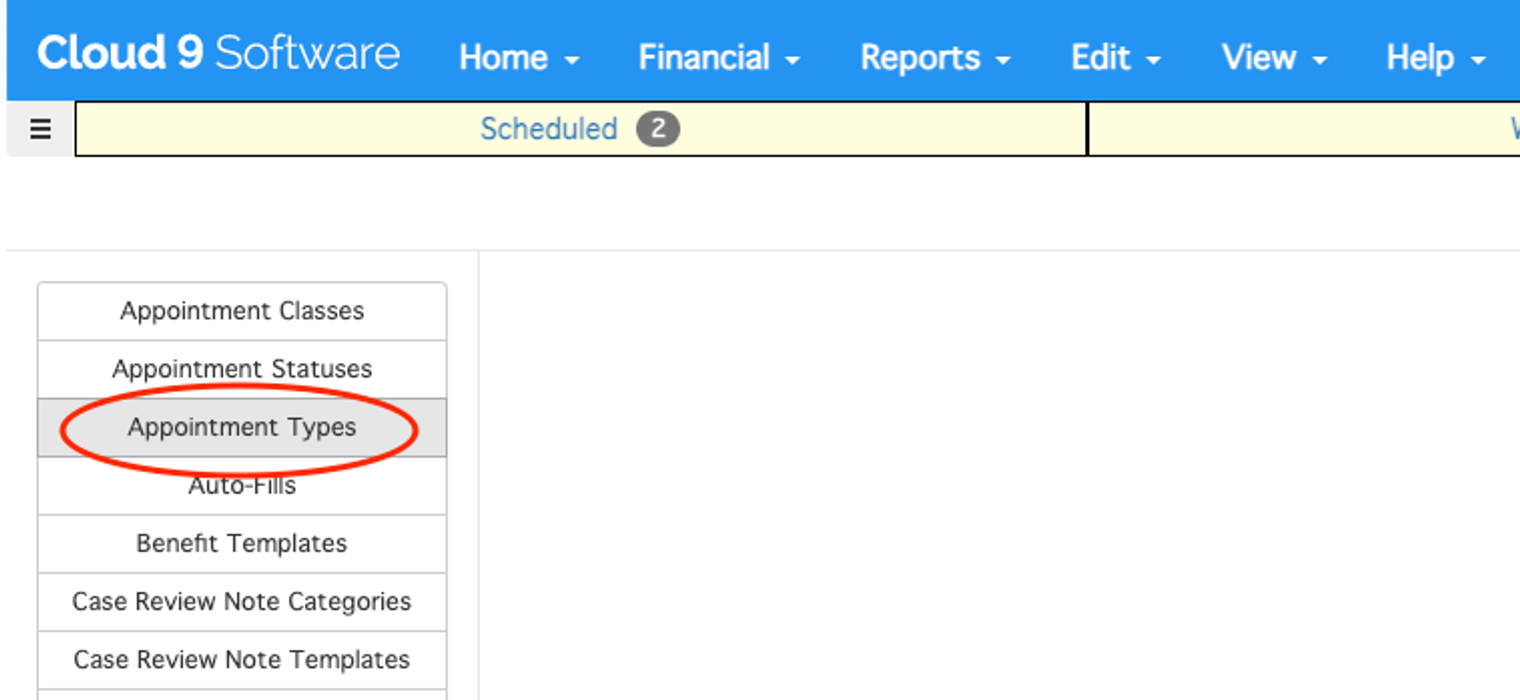
If you use online booking, every Cloud9 appointment needs a Cloud9 appointment type. An appointment sent without one fails. Note the default appointment type the integration should use when you do not set one through appointment descriptors.
-
Install Chrome Extension v7 for Cloud9 on each practice workstation that accesses the health record system. See Chrome Extension installation.
-
Use the token from the Developer Portal to sign in to the Chrome Extension on each workstation.
Curve Dental
- Get the unique URL for the Curve Dental account, for example https://practicenamehere.curvehero.com.
- Create a Curve Dental username and password for a dedicated user account that only NexHealth uses. Turn off MFA for this user.
- Set the user account Role to "Office Manager".
- Install Chrome Extension v2 for Curve Dental on each practice workstation that accesses the health record system. See Chrome Extension installation.
- Use the token from the Developer Portal to sign in to the Chrome Extension on each workstation.
Dentrix Ascend
- Get the unique URL for the Dentrix Ascend account, for example https://live.dentrixascend.com/login.
- Get the Dentrix Ascend organization alias (ORG ID).
- Create a Dentrix Ascend username and password for a dedicated user account that only NexHealth uses. Turn off MFA for this user.
- Set the user account Role to "Receptionist".
- Install Chrome Extension v3 for Dentrix Ascend on each practice workstation that accesses the health record system. See Chrome Extension installation.
- Use the token from the Developer Portal to sign in to the Chrome Extension on each workstation.
Denticon
- Create a Denticon username and password for a dedicated user account that only NexHealth uses. Use the username format "NXHUSER****". The asterisks stand for a number that the Developer Portal gives you. If the username is taken, raise the number. You can raise it by a large amount.
- Set the user account Group to "Office Manager".
- Let the user log in at all hours of the day. This is a user setting under Setup -> Security -> Users -> Login Info.
- Install Chrome Extension v1 for Denticon on each practice workstation that accesses the health record system. See Chrome Extension installation.
- Use the token from the Developer Portal to sign in to the Chrome Extension on each workstation.
eClinicalWorks
- Get the unique URL for the eClinicalWorks account, for example https://yourpracticenamehere.eclinicalweb.com.
- If you cannot find the eClinicalWorks web URL, email [email protected] for help.
- Create an eClinicalWorks username and password for a dedicated user account that only NexHealth uses.
- Set the user account User type to "Staff".
- Give the user account access to these areas:
- Menu ⇒ Patient ⇒ Lookup, to search for and select patients and view their details in Patient Hub
- These items, found in Menu > Security Settings > By Security Attribute:
- Create New Patient
- Delete Appointment
- Go to Menu > File > Authentication Settings and set "Enforce eCW URL Launcher for Login" to false.
- Install Chrome Extension v4 for eClinicalWorks on each practice workstation that accesses the health record system. See Chrome Extension installation.
- Use the token from the Developer Portal to sign in to the Chrome Extension on each workstation.
Modernizing Medicine (ModMed)
We need the following for a ModMed integration.
- The unique URL the practice uses to log in.
- The locations in the account to integrate with. Submit these with the install request.
- Two ModMed user accounts, a Clinical user account and a Management user account.
- The Clinical user account needs access to these headers:
- Schedule
- Appt Flow
- Patients
- Document Management
- The Management user needs an administrator role and access to these headers:
- Practice Settings
- Including the sub-section called Event Logs, with access to Audit Event Logs
- Clipboard / Kiosk / Portal Settings
- Practice Management Settings
- Practice Settings
- The Clinical user account needs access to these headers:
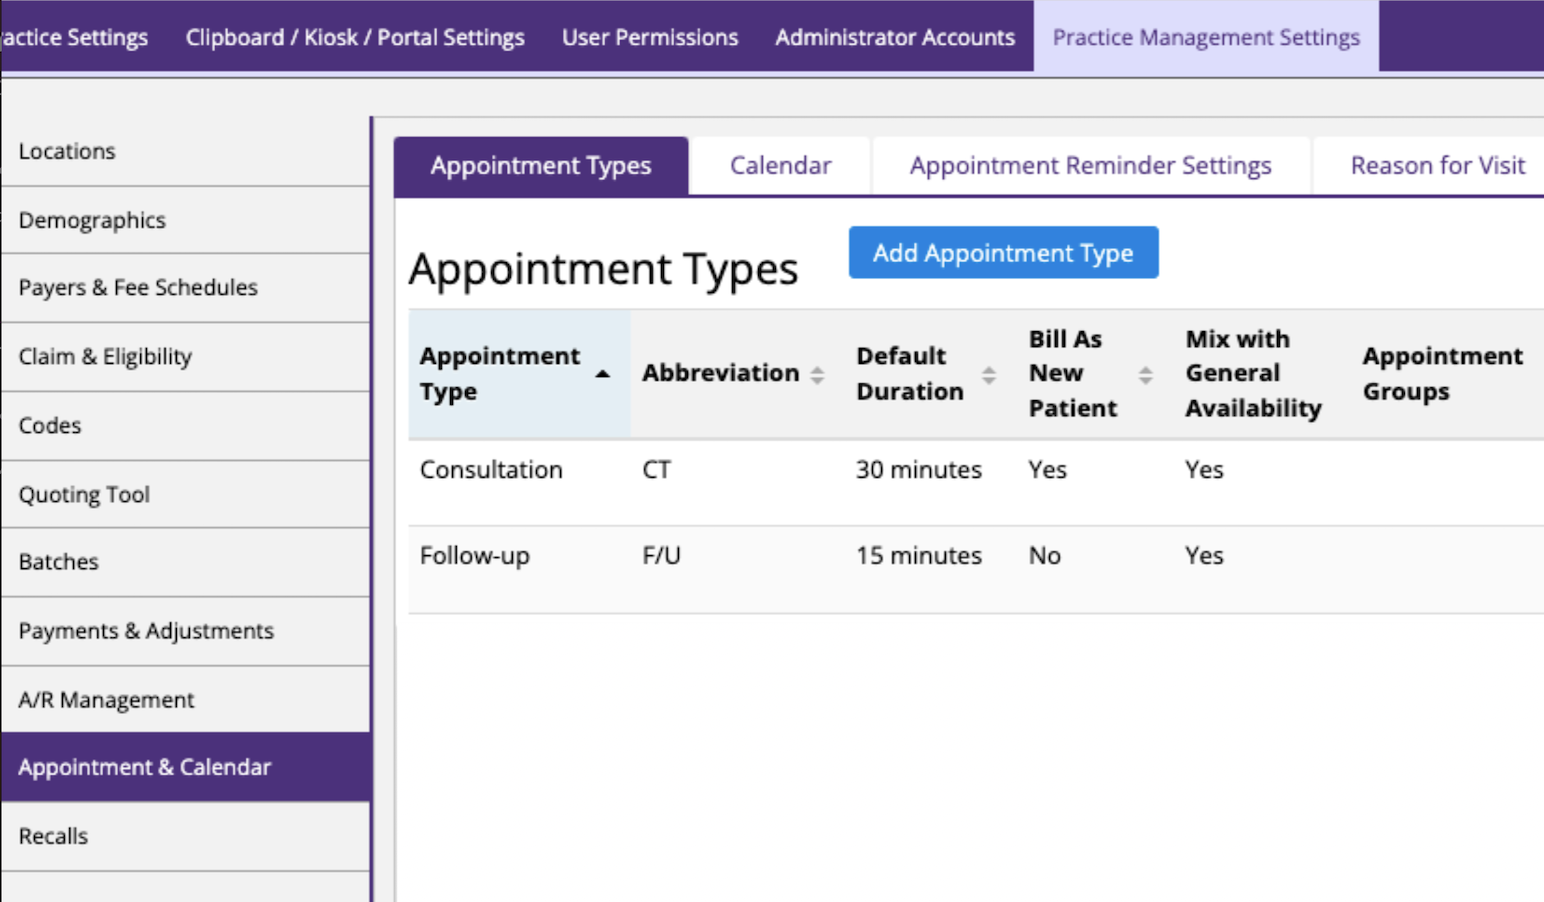
If you use online booking, every ModMed appointment needs a ModMed appointment type. An appointment sent without one fails. Note the default appointment type the integration should use when you do not set one through appointment descriptors.
The list of appointment types is in the Practice Management Settings tab, under the Appointment & Calendar menu in the left navigation, as shown below.
NextGen
We need the following for a NextGen integration. This integration does not need a Chrome Extension.
- A new dedicated practice admin user.
- Important: Register the user with an email address that NexHealth provides. Email [email protected] for more information.
- The names of the locations you need NexHealth to sync with.
Chrome Extension installation
Most cloud-based health record systems need a version of the NexHealth Synchronizer Chrome Extension. Install it on every workstation where staff change the schedule. That includes creating and editing patients and appointments.
Mass deployment to many workstations is available if the practice uses remote management software (RMS) that can deploy a .exe file to all its machines, or a Group Policy Object (GPO). The steps depend on the integration and the institution. Email [email protected] for next steps.
To install by hand, follow these steps.
- Click the Chrome Extension link for the health record system. Click Add to Chrome, then Confirm on the next screen.
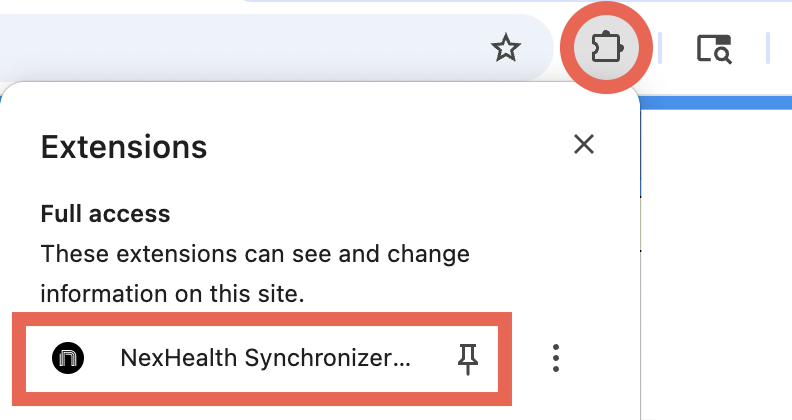
- Turn the extension on. Click the extensions icon at the top right of Chrome and select NexHealth.
-
NexHealth gives you a unique token for each practice. If you need help getting a token, email [email protected].
-
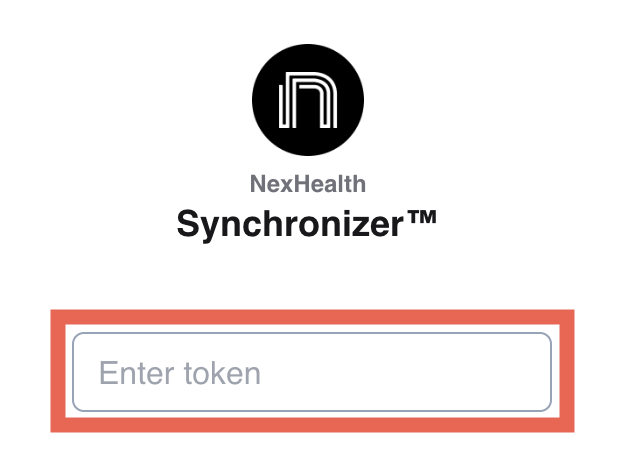
Enter the practice's token at the bottom of the login screen.
- Install the extension on all practice workstations.
Troubleshooting install failures
Most install failures come down to whitelisting or permissions. Work through this list, then try the install again.
Whitelist these ports
- 4506
- 4505
- 443
Whitelist these file paths
C:\NexHealthC:\Program Files\Salt Project\SaltC:\Program Files\NexHealthC:\Program Files (x86)\NexHealthC:\ProgramData\NexHealth
Whitelist these domains
*.nexhealth.info*.nexhealth-it.com*.nexhealth.comhttp://nexhealth-backend-state-cache-development-us-east-1.s3.amazonaws.com/
Run as an administrator. Log into Windows as an admin, or run the installer as an administrator.
Update Microsoft Visual C++. If the installer does not open, install the latest Microsoft Visual C++ redistributable and try again.
NexHealth services. The installed Windows services are named NexHealth Synchronizer and NexHealth Connectivity Agent.
Still stuck? Email [email protected] and put the institution name in the subject line.
FAQs
Cloud-based systems
Can I use an existing user for the NexHealth sync?
To prevent delays, the office should provide a dedicated user. The username must not be used by any person or automated process. NexHealth may change the password to keep the account secure. If a person or process keeps logging in with the old password, the website deactivates the user. If the user is not dedicated in this way, we may not be able to go ahead with the integration.
Why do I need to install the Chrome Extension?
The Chrome Extension gives a real-time sync. It picks up new patients, appointments, cancellations and reschedules right away.
Where do I need to install the Chrome Extension?
Install it on every workstation where anyone changes the health record system, for example adding patients, adding appointments or rescheduling. That is how the Synchronizer picks up every change in real time.
Updated 1 day ago