

Payments quickstart
Read a patient's charges and post a payment to the ledger.
In this guide you create a payment through the Synchronizer API. The payment pays off a sample patient balance in a working health record system, Open Dental.
By the end, a test patient's balance is paid off in Open Dental through your code.
Before you startYou need a sandbox location connected to a health record system. If you do not have one, follow Setting up an Open Dental sandbox sync.
1. Get ready
Set up a developer account
If you do not have one, follow the Quickstart and save your API key.
Find your subdomain and location ID
- Log in to the Developer Portal, click Institutions, then your demo practice.
- The subdomain is under the institution's name. Click it to copy it.
- The Open Dental location's ID is on the right. Click it to copy it.
Pick a language
Every step has the same call in cURL, Node and Python.
- cURL. Install
curlandjq, which pulls values out of each response. Run each step in your terminal. - Node. Node 18 or later. Add each step to
payments.mjsand run it after the last step. - Python. Install
requests. Add each step topayments.pyand run it after the last step.
Save your API key, subdomain and location ID in your terminal. All three languages read them from there.
export NEX_API_KEY="your-sandbox-api-key"
export NEX_SUBDOMAIN="your-subdomain"
export NEX_LOCATION_ID="your-location-id"
Get a token
Trade your API key for a bearer token. Every other call uses it.
export NEX_TOKEN=$(curl -s --request POST \
  --url "https://nexhealth.info/authenticates" \
  --header "Nex-Api-Version: v3.0.0" \
  --header "Authorization: $NEX_API_KEY" | jq -r '.data.token')

echo $NEX_TOKEN
// Save as payments.mjs and run: node payments.mjs
// Needs Node 18 or later.
const BASE = "https://nexhealth.info";
const scope = { subdomain: process.env.NEX_SUBDOMAIN, location_id: process.env.NEX_LOCATION_ID };
async function call(method, path, opts = {}) {
const url = new URL(BASE + path);
for (const [key, value] of Object.entries(opts.query || {})) {
url.searchParams.set(key, value);
}
const res = await fetch(url, {
method,
headers: {
"Nex-Api-Version": "v3.0.0",
"Content-Type": "application/json",
Authorization: opts.token ? "Bearer " + opts.token : process.env.NEX_API_KEY,
},
body: opts.body ? JSON.stringify(opts.body) : undefined,
});
const text = await res.text();
const json = text ? JSON.parse(text) : {};
if (!res.ok || json.code === false) {
throw new Error(method + " " + path + " failed: " + res.status + " " + JSON.stringify(json.error));
}
return json.data;
}
// 1. Get a token
const { token } = await call("POST", "/authenticates");# Save as payments.py and run: python payments.py
# Needs the requests package: pip install requests
import os
import requests
BASE = "https://nexhealth.info"
scope = {"subdomain": os.environ["NEX_SUBDOMAIN"], "location_id": os.environ["NEX_LOCATION_ID"]}
def call(method, path, token=None, params=None, body=None):
res = requests.request(
method,
BASE + path,
params=params,
json=body,
headers={
"Nex-Api-Version": "v3.0.0",
"Authorization": "Bearer " + token if token else os.environ["NEX_API_KEY"],
},
)
payload = res.json() if res.content else {}
if not res.ok or payload.get("code") is False:
raise RuntimeError(f"{method} {path} failed: {res.status_code} {payload.get('error')}")
return payload.get("data")
# 1. Get a token
token = call("POST", "/authenticates")["token"]2. Gather the charges
The Open Dental demo comes with test patients who have balances. A charge is a line item on the ledger that raises the patient's balance; each one belongs to a completed procedure.
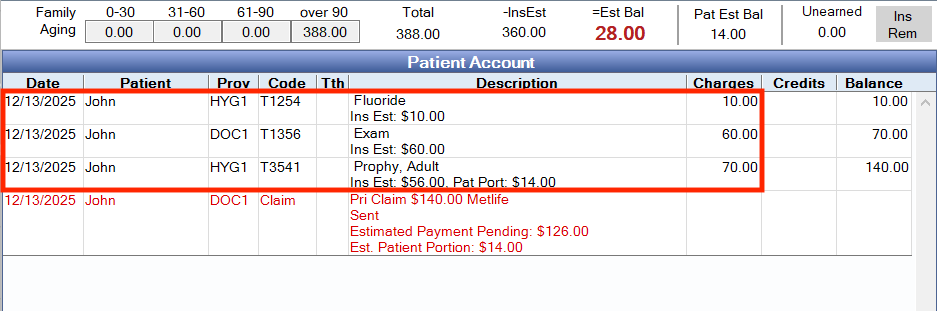
The image shows the charges for the test patient John Smith, including $70 for a prophylaxis (routine cleaning). In this step you open John's ledger in Open Dental, look him up through the API, then list his charges.
Find the patient in Open Dental
- On the appointments page in Open Dental, click Select Patient.
- Click John Smith, then OK.
- Click the Account tab to see his ledger.
Find the patient through the API
Search GET /patients by name to get John's NexHealth patient ID.
export NEX_PATIENT_ID=$(curl -s --request GET \
  --url "https://nexhealth.info/patients?subdomain=$NEX_SUBDOMAIN&location_id=$NEX_LOCATION_ID&name=John%20Smith" \
  --header "Nex-Api-Version: v3.0.0" \
  --header "Authorization: Bearer $NEX_TOKEN" | jq -r '.data[0].id')

echo $NEX_PATIENT_ID
// 2. Find the patient
const [patient] = await call("GET", "/patients", { token, query: { ...scope, name: "John Smith" } });
console.log("Patient ID:", patient.id);# 2. Find the patient
patient = call("GET", "/patients", token, {**scope, "name": "John Smith"})[0]
print("Patient ID:", patient["id"])List the patient's charges
Send John's patient ID to GET /charges and sort by updated_at. These are the line items you saw on the ledger.
curl -s --request GET \
  --url "https://nexhealth.info/charges?subdomain=$NEX_SUBDOMAIN&location_id=$NEX_LOCATION_ID&patient_id=$NEX_PATIENT_ID&sort=updated_at&per_page=100" \
  --header "Nex-Api-Version: v3.0.0" \
  --header "Authorization: Bearer $NEX_TOKEN" > charges.json

jq '.data[] | {id, description, fee}' charges.json
// 3. List the patient's charges
const charges = await call("GET", "/charges", {
token,
query: { ...scope, patient_id: patient.id, sort: "updated_at", per_page: 100 },
});
for (const charge of charges) {
console.log(charge.id, charge.description, charge.fee.amount);
}# 3. List the patient's charges
charges = call("GET", "/charges", token, {**scope, "patient_id": patient["id"], "sort": "updated_at", "per_page": 100})
for charge in charges:
print(charge["id"], charge["description"], charge["fee"]["amount"])Each charge has an id and a fee. The fee amount is a string in dollars, such as "70.00". You need the ID and the amount of each charge to post the payment.
3. Post the payment
You have the patient's ID and the charges. Two more values, then the payment.
Get a payment type ID
GET /payment_types lists the payment types set up in the health record system. Find the ID of the "Credit Card" payment type.
export NEX_PAYMENT_TYPE_ID=$(curl -s --request GET \
  --url "https://nexhealth.info/payment_types?subdomain=$NEX_SUBDOMAIN&location_id=$NEX_LOCATION_ID&per_page=100" \
  --header "Nex-Api-Version: v3.0.0" \
  --header "Authorization: Bearer $NEX_TOKEN" | jq -r '.data[] | select(.name == "Credit Card") | .id')

echo $NEX_PAYMENT_TYPE_ID
// 4. Get the payment type
const paymentTypes = await call("GET", "/payment_types", { token, query: { ...scope, per_page: 100 } });
const creditCard = paymentTypes.find((type) => type.name === "Credit Card");
console.log("Payment type ID:", creditCard.id);# 4. Get the payment type
payment_types = call("GET", "/payment_types", token, {**scope, "per_page": 100})
credit_card = next(item for item in payment_types if item["name"] == "Credit Card")
print("Payment type ID:", credit_card["id"])Choose a transaction ID
Unlike most IDs in the API, the transaction ID is a string you choose. The samples use "test-transaction-id".
Transaction IDs must be unique: use a new one for every payment. We recommend the name of your organization in the Developer Portal followed by a running number, for example "NexDev:0001" and "NexDev:0002". NexHealth uses the ID to identify the payment it writes into the health record system, and
GET /paymentscan filter by it.
Post the payment through the Synchronizer API
Send a POST request to /payments with these fields.
| Field | Value |
|---|---|
patient_id | John's patient ID. |
amount | The total of the charges. It is negative because the payment lowers the patient's balance. |
payment_type_id | The ID of the "Credit Card" payment type. |
transaction_id | The string you chose. |
charge_splits | Which charges the payment covers and how much goes to each one. Each key is a charge ID. Each value is the amount of that charge. The amounts are negative. |
This payment pays off the balance for all three of the patient's procedures at once.
jq '[.data[] | {key: (.id | tostring), value: (-(.fee.amount | tonumber))}] | from_entries' charges.json > charge-splits.json
export NEX_AMOUNT=$(jq '[.[]] | add | . * 100 | round / 100' charge-splits.json)

cat > payment.json <<EOF
{
  "payment": {
    "patient_id": $NEX_PATIENT_ID,
    "amount": $NEX_AMOUNT,
    "payment_type_id": $NEX_PAYMENT_TYPE_ID,
    "transaction_id": "test-transaction-id",
    "charge_splits": $(cat charge-splits.json)
  }
}
EOF

curl -s --request POST \
  --url "https://nexhealth.info/payments?subdomain=$NEX_SUBDOMAIN&location_id=$NEX_LOCATION_ID" \
  --header "Nex-Api-Version: v3.0.0" \
  --header "Authorization: Bearer $NEX_TOKEN" \
  --header "Content-Type: application/json" \
  --data @payment.json \
  --write-out "\nHTTP %{http_code}\n"
// 5. Post the payment
const cents = charges.map((charge) => Math.round(Number(charge.fee.amount) * 100));
const chargeSplits = Object.fromEntries(charges.map((charge, i) => [charge.id, -cents[i] / 100]));
const amount = -cents.reduce((sum, value) => sum + value, 0) / 100;
await call("POST", "/payments", {
token,
query: scope,
body: {
payment: {
patient_id: patient.id,
amount,
payment_type_id: creditCard.id,
transaction_id: "test-transaction-id",
charge_splits: chargeSplits,
},
},
});
console.log("Payment sent:", amount);# 5. Post the payment
cents = [round(float(charge["fee"]["amount"]) * 100) for charge in charges]
charge_splits = {str(charge["id"]): -value / 100 for charge, value in zip(charges, cents)}
amount = -sum(cents) / 100
call(
"POST",
"/payments",
token,
scope,
{
"payment": {
"patient_id": patient["id"],
"amount": amount,
"payment_type_id": credit_card["id"],
"transaction_id": "test-transaction-id",
"charge_splits": charge_splits,
}
},
)
print("Payment sent:", amount)The API answers with 202. NexHealth then writes the payment into the health record system.
If you run the sample again, change the transaction ID first.
Check that the payment is on the Open Dental ledger
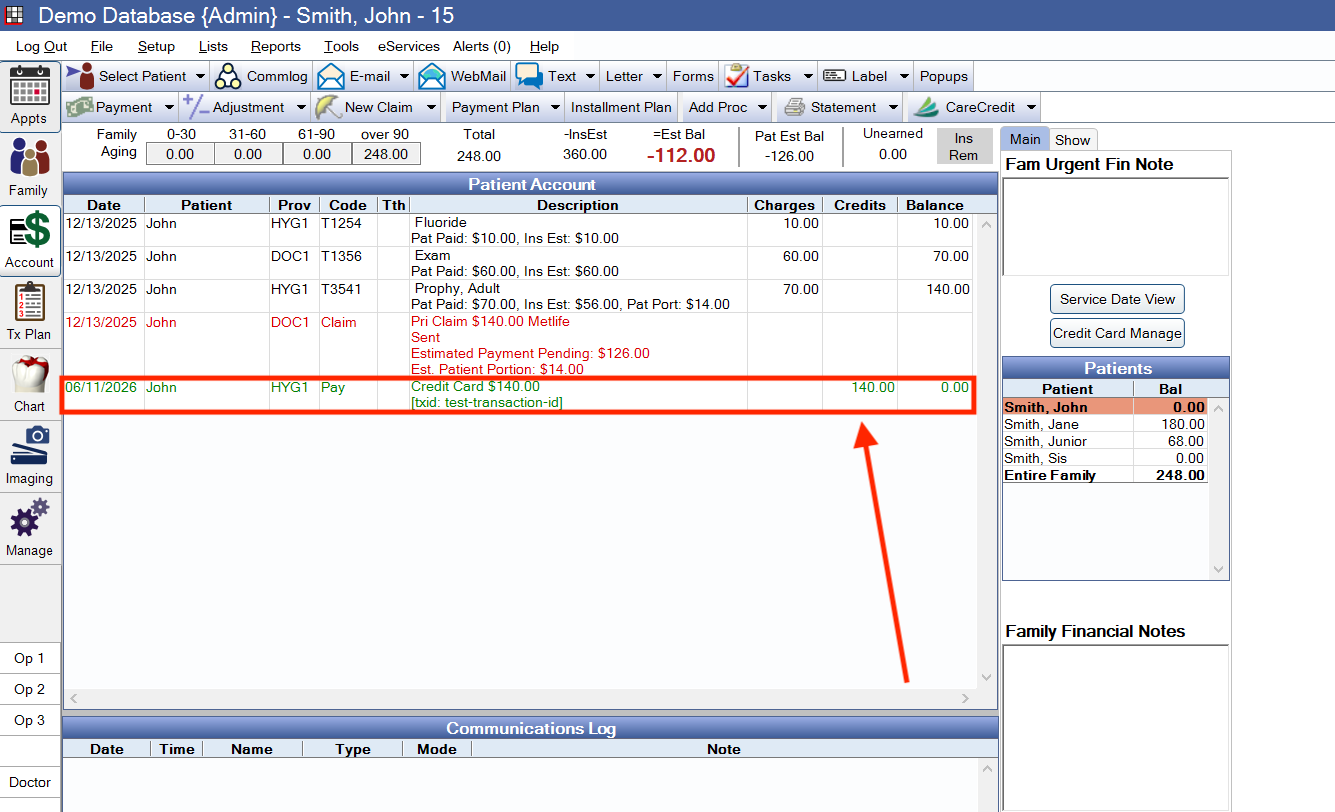
Go back to John's ledger in Open Dental. Open another page and come back to refresh it. The payment is there.
What differs by health record system
Payments and adjustments are written to Dentrix, Dentrix Enterprise, Eaglesoft and Open Dental, and only where the practice has ledger sync turned on. On other systems the API still returns 202 and the payment never reaches the ledger. Subscribe to payment_insertion to know when a payment landed or failed. See Testing writes, per system.
Move to production
When you are ready to make production calls to the ledger and financial endpoints, email [email protected]. Our team has to enable your production API key for ledger and financial data.
Updated 2 days ago